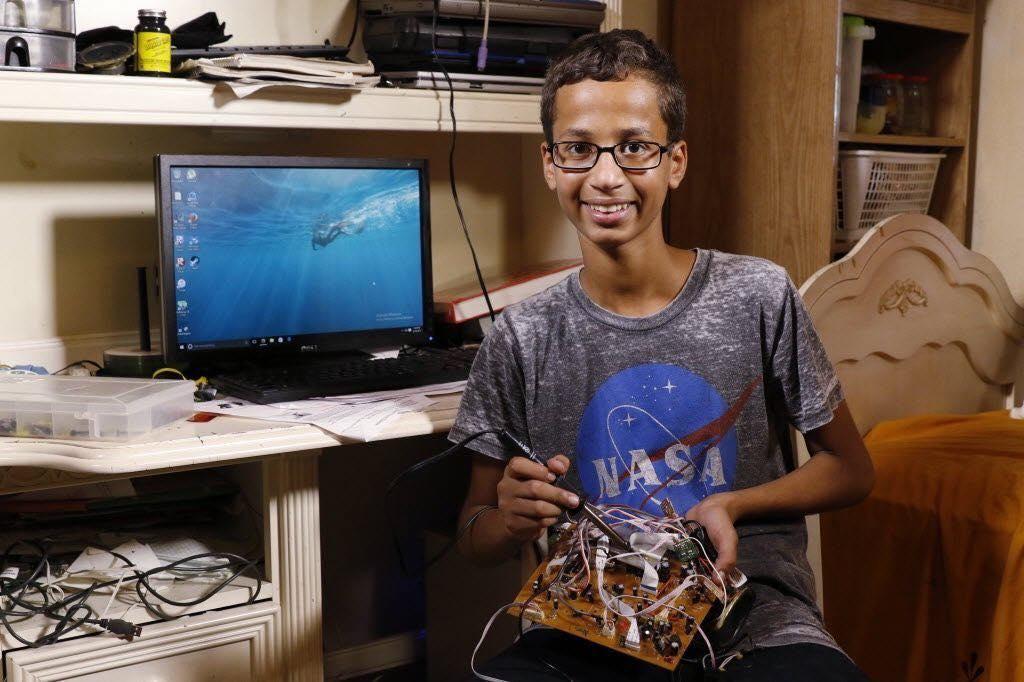
• Bulgogi Chicken

    Korean BBQ Bulgogi Chicken with Soy-Garlic Marinade

    Ingredients:

    1 ½ lbs boneless, skinless chicken thighs (cut into strips)

    4 tablespoons soy sauce

    2 tablespoons brown sugar

    1 tablespoon honey

    1 tablespoon sesame oil

    3 garlic cloves, minced

    1 tablespoon grated ginger

    2 green onions, chopped

    1 tablespoon rice vinegar

    1 tablespoon gochujang (Korean red chili paste)

    1 teaspoon toasted sesame seeds

    1 tablespoon vegetable oil (for cooking)

    Cooked rice and lettuce leaves, for serving

    Directions:

    In a bowl, whisk together soy sauce, brown sugar, honey, sesame oil, garlic, ginger, green onions, rice vinegar, and gochujang to create the marinade.

    Add the chicken strips to the marinade, mix well, and cover. Refrigerate for at least 1 hour (or overnight for best flavor).

    Heat vegetable oil in a skillet over medium-high heat. Add marinated chicken in batches and cook for 4–5 minutes on each side until caramelized and cooked through.

    Sprinkle with toasted sesame seeds.

    Serve hot over steamed rice or wrapped in lettuce leaves with optional kimchi or pickled veggies on the side.

    Prep Time: 10 minutes + marinating | Cooking Time: 15 minutes | Total Time: 25 minutes (+ marinate)
    Kcal: 390 kcal | Servings: 4 servings

    #koreanfood #bulgogichicken #asianrecipes #chickendinner #quickmeals #mealprepideas #koreanbbq #gochujang #soygarlic #grilledchicken #homecooking #koreancuisine #weeknightdinner #savoryflavors #garlicchicken #spicychicken #easychickenrecipes #ricebowl #foodblogfeed #homemadekorean

    Sweet, savory, spicy — this Bulgogi Chicken is your new weeknight favorite! Served over rice or wrapped in lettuce, it’s Korean comfort food at its best.
    Bulgogi Chicken Korean BBQ Bulgogi Chicken with Soy-Garlic Marinade Ingredients: 1 ½ lbs boneless, skinless chicken thighs (cut into strips) 4 tablespoons soy sauce 2 tablespoons brown sugar 1 tablespoon honey 1 tablespoon sesame oil 3 garlic cloves, minced 1 tablespoon grated ginger 2 green onions, chopped 1 tablespoon rice vinegar 1 tablespoon gochujang (Korean red chili paste) 1 teaspoon toasted sesame seeds 1 tablespoon vegetable oil (for cooking) Cooked rice and lettuce leaves, for serving Directions: In a bowl, whisk together soy sauce, brown sugar, honey, sesame oil, garlic, ginger, green onions, rice vinegar, and gochujang to create the marinade. Add the chicken strips to the marinade, mix well, and cover. Refrigerate for at least 1 hour (or overnight for best flavor). Heat vegetable oil in a skillet over medium-high heat. Add marinated chicken in batches and cook for 4–5 minutes on each side until caramelized and cooked through. Sprinkle with toasted sesame seeds. Serve hot over steamed rice or wrapped in lettuce leaves with optional kimchi or pickled veggies on the side. Prep Time: 10 minutes + marinating | Cooking Time: 15 minutes | Total Time: 25 minutes (+ marinate) Kcal: 390 kcal | Servings: 4 servings #koreanfood #bulgogichicken #asianrecipes #chickendinner #quickmeals #mealprepideas #koreanbbq #gochujang #soygarlic #grilledchicken #homecooking #koreancuisine #weeknightdinner #savoryflavors #garlicchicken #spicychicken #easychickenrecipes #ricebowl #foodblogfeed #homemadekorean Sweet, savory, spicy — this Bulgogi Chicken is your new weeknight favorite! Served over rice or wrapped in lettuce, it’s Korean comfort food at its best.
    Like
    Love
    Wow
    3
    · 0 Comments ·0 Shares ·30K Views
  • Chinese Beef and Onion Stir Fry

    Savory Chinese-Style Beef and Onion Stir Fry with Garlic Soy Sauce

    Ingredients:

    1 lb (450g) flank steak, thinly sliced against the grain

    2 tablespoons soy sauce

    1 tablespoon oyster sauce

    1 tablespoon hoisin sauce

    1 tablespoon Shaoxing wine (or dry sherry)

    1 teaspoon sesame oil

    1 tablespoon cornstarch

    2 tablespoons vegetable oil

    1 large onion, sliced

    3 cloves garlic, minced

    ½ teaspoon ground white pepper

    2 scallions, sliced (optional garnish)

    Directions:

    In a bowl, mix the soy sauce, oyster sauce, hoisin sauce, Shaoxing wine, sesame oil, and cornstarch.

    Add the sliced beef and toss to coat. Let marinate for at least 15 minutes.

    Heat a wok or large skillet over high heat. Add 1 tablespoon of oil.

    Sear the beef in batches, 1–2 minutes per side, until browned. Remove and set aside.

    Add remaining oil to the wok. Stir-fry the onion for 2–3 minutes until soft and slightly charred.

    Add garlic and cook for 30 seconds.

    Return the beef to the wok, sprinkle with white pepper, and toss everything together for 1–2 minutes.

    Serve hot, garnished with scallions if desired. Perfect with steamed jasmine rice.

    Prep Time: 15 minutes | Cooking Time: 10 minutes | Total Time: 25 minutes
    Kcal: 320 kcal per serving | Servings: 4 servings

    #chinesebeefstirfry #beefandonion #asianrecipes #stirfrydinner #easyweeknightmeal #flanksteak #garlicbeef #homemadechinesetakeout #quickstirfry #oystersauce #beeffavorites #simpleasiandinner #onionlovers #wokrecipes #sesameflavor #savorybeef #hoisinsauce #chinesehomecooking #riceandbeef #fastfamilydinner

    Dinner in 25 minutes? This Chinese Beef and Onion Stir Fry is juicy, savory, and packed with bold umami flavors!
    Chinese Beef and Onion Stir Fry Savory Chinese-Style Beef and Onion Stir Fry with Garlic Soy Sauce Ingredients: 1 lb (450g) flank steak, thinly sliced against the grain 2 tablespoons soy sauce 1 tablespoon oyster sauce 1 tablespoon hoisin sauce 1 tablespoon Shaoxing wine (or dry sherry) 1 teaspoon sesame oil 1 tablespoon cornstarch 2 tablespoons vegetable oil 1 large onion, sliced 3 cloves garlic, minced ½ teaspoon ground white pepper 2 scallions, sliced (optional garnish) Directions: In a bowl, mix the soy sauce, oyster sauce, hoisin sauce, Shaoxing wine, sesame oil, and cornstarch. Add the sliced beef and toss to coat. Let marinate for at least 15 minutes. Heat a wok or large skillet over high heat. Add 1 tablespoon of oil. Sear the beef in batches, 1–2 minutes per side, until browned. Remove and set aside. Add remaining oil to the wok. Stir-fry the onion for 2–3 minutes until soft and slightly charred. Add garlic and cook for 30 seconds. Return the beef to the wok, sprinkle with white pepper, and toss everything together for 1–2 minutes. Serve hot, garnished with scallions if desired. Perfect with steamed jasmine rice. Prep Time: 15 minutes | Cooking Time: 10 minutes | Total Time: 25 minutes Kcal: 320 kcal per serving | Servings: 4 servings #chinesebeefstirfry #beefandonion #asianrecipes #stirfrydinner #easyweeknightmeal #flanksteak #garlicbeef #homemadechinesetakeout #quickstirfry #oystersauce #beeffavorites #simpleasiandinner #onionlovers #wokrecipes #sesameflavor #savorybeef #hoisinsauce #chinesehomecooking #riceandbeef #fastfamilydinner Dinner in 25 minutes? This Chinese Beef and Onion Stir Fry is juicy, savory, and packed with bold umami flavors!
    Like
    Love
    Wow
    3
    · 0 Comments ·0 Shares ·31K Views
  • Blueberry Lemon Banana Bread

    Moist Blueberry Lemon Banana Bread with Citrus Glaze

    Ingredients:

    2 ripe bananas, mashed

    1 cup fresh blueberries (or frozen, tossed in 1 tsp flour)

    2 eggs

    1/2 cup unsalted butter, melted

    1/2 cup granulated sugar

    1/4 cup brown sugar

    1/4 cup Greek yogurt or sour cream

    2 tablespoons fresh lemon juice

    1 tablespoon lemon zest

    1 1/2 cups all-purpose flour

    1 teaspoon baking soda

    1/2 teaspoon salt

    1 teaspoon vanilla extract

    Optional Lemon Glaze:

    1/2 cup powdered sugar

    1–2 tablespoons fresh lemon juice

    Directions:

    Preheat oven to 350°F (175°C). Grease a 9x5-inch loaf pan and line with parchment paper.

    In a large bowl, whisk mashed bananas, melted butter, sugars, eggs, yogurt, lemon juice, lemon zest, and vanilla until smooth.

    In another bowl, whisk together flour, baking soda, and salt.

    Gently fold dry ingredients into the wet mixture until just combined.

    Carefully fold in the blueberries. Do not overmix.

    Pour batter into prepared loaf pan and smooth the top.

    Bake for 50–60 minutes, or until a toothpick inserted in the center comes out clean.

    Let cool for 10 minutes in the pan, then remove to a wire rack.

    If desired, mix powdered sugar with lemon juice and drizzle over the cooled loaf.

    Prep Time: 15 minutes | Cooking Time: 55 minutes | Total Time: 1 hour 10 minutes
    Kcal: 290 kcal | Servings: 8 slices

    #bananabread #blueberrybanana #lemonloaf #bakingathome #quickbread #fruitbread #moistbananabread #homemadebaking #easyloafcake #lemonbanana #springbaking #blueberryrecipes #sweetloaf #dessertideas #citrusbread #bakingwithfruit #breakfasttreat #bananaandblueberry #zestybread #lemonlover

    Bursting with fresh blueberries, banana sweetness, and a lemony zing, this Blueberry Lemon Banana Bread is pure sunshine in every slice!
    Blueberry Lemon Banana Bread Moist Blueberry Lemon Banana Bread with Citrus Glaze Ingredients: 2 ripe bananas, mashed 1 cup fresh blueberries (or frozen, tossed in 1 tsp flour) 2 eggs 1/2 cup unsalted butter, melted 1/2 cup granulated sugar 1/4 cup brown sugar 1/4 cup Greek yogurt or sour cream 2 tablespoons fresh lemon juice 1 tablespoon lemon zest 1 1/2 cups all-purpose flour 1 teaspoon baking soda 1/2 teaspoon salt 1 teaspoon vanilla extract Optional Lemon Glaze: 1/2 cup powdered sugar 1–2 tablespoons fresh lemon juice Directions: Preheat oven to 350°F (175°C). Grease a 9x5-inch loaf pan and line with parchment paper. In a large bowl, whisk mashed bananas, melted butter, sugars, eggs, yogurt, lemon juice, lemon zest, and vanilla until smooth. In another bowl, whisk together flour, baking soda, and salt. Gently fold dry ingredients into the wet mixture until just combined. Carefully fold in the blueberries. Do not overmix. Pour batter into prepared loaf pan and smooth the top. Bake for 50–60 minutes, or until a toothpick inserted in the center comes out clean. Let cool for 10 minutes in the pan, then remove to a wire rack. If desired, mix powdered sugar with lemon juice and drizzle over the cooled loaf. Prep Time: 15 minutes | Cooking Time: 55 minutes | Total Time: 1 hour 10 minutes Kcal: 290 kcal | Servings: 8 slices #bananabread #blueberrybanana #lemonloaf #bakingathome #quickbread #fruitbread #moistbananabread #homemadebaking #easyloafcake #lemonbanana #springbaking #blueberryrecipes #sweetloaf #dessertideas #citrusbread #bakingwithfruit #breakfasttreat #bananaandblueberry #zestybread #lemonlover Bursting with fresh blueberries, banana sweetness, and a lemony zing, this Blueberry Lemon Banana Bread is pure sunshine in every slice!
    Like
    Love
    Wow
    3
    · 0 Comments ·0 Shares ·32K Views
  • Spicy Chimichurri Sauce

    Fiery Argentine Chimichurri with Fresh Herbs and Chili Heat

    Ingredients:

    1 cup fresh parsley, finely chopped

    1/2 cup fresh cilantro, finely chopped

    4 garlic cloves, minced

    1 small red chili or 1 teaspoon red pepper flakes (adjust to taste)

    2 tablespoons red wine vinegar

    1/2 teaspoon dried oregano

    1/2 teaspoon smoked paprika

    1/2 teaspoon salt

    1/4 teaspoon black pepper

    Juice of 1/2 lemon (optional, for brightness)

    1/2 cup extra virgin olive oil

    Directions:

    In a medium bowl, combine parsley, cilantro, garlic, chili (or red pepper flakes), oregano, paprika, salt, and black pepper.

    Add red wine vinegar and lemon juice, then slowly drizzle in olive oil while stirring to combine.

    Mix until the sauce is well blended but still slightly chunky.

    Taste and adjust seasoning, adding more chili if you like it spicier.

    Let sit for at least 15 minutes to allow flavors to meld.

    Serve with grilled meats, roasted veggies, or crusty bread.

    Prep Time: 10 minutes | Rest Time: 15 minutes | Total Time: 25 minutes
    Kcal: 90 kcal per tbsp | Servings: 12 servings

    #chimichurri #argentinianflavors #spicysauce #herbsauce #grillingsauce #homemadecondiments #spicyherbs #steaksauce #saucerecipe #oliveoilsauce #boldflavors #chimichurrisauce #chimichurrilove #bbqsauce #freshandspicy #greenmagic #spicychimichurri #latinkitchen #easychimichurri #saucygoodness

    This Spicy Chimichurri Sauce is bold, herbaceous, and packing a zesty punch. Perfect for grilled meats, veggies, or even as a dipping sauce!
    Spicy Chimichurri Sauce Fiery Argentine Chimichurri with Fresh Herbs and Chili Heat Ingredients: 1 cup fresh parsley, finely chopped 1/2 cup fresh cilantro, finely chopped 4 garlic cloves, minced 1 small red chili or 1 teaspoon red pepper flakes (adjust to taste) 2 tablespoons red wine vinegar 1/2 teaspoon dried oregano 1/2 teaspoon smoked paprika 1/2 teaspoon salt 1/4 teaspoon black pepper Juice of 1/2 lemon (optional, for brightness) 1/2 cup extra virgin olive oil Directions: In a medium bowl, combine parsley, cilantro, garlic, chili (or red pepper flakes), oregano, paprika, salt, and black pepper. Add red wine vinegar and lemon juice, then slowly drizzle in olive oil while stirring to combine. Mix until the sauce is well blended but still slightly chunky. Taste and adjust seasoning, adding more chili if you like it spicier. Let sit for at least 15 minutes to allow flavors to meld. Serve with grilled meats, roasted veggies, or crusty bread. Prep Time: 10 minutes | Rest Time: 15 minutes | Total Time: 25 minutes Kcal: 90 kcal per tbsp | Servings: 12 servings #chimichurri #argentinianflavors #spicysauce #herbsauce #grillingsauce #homemadecondiments #spicyherbs #steaksauce #saucerecipe #oliveoilsauce #boldflavors #chimichurrisauce #chimichurrilove #bbqsauce #freshandspicy #greenmagic #spicychimichurri #latinkitchen #easychimichurri #saucygoodness This Spicy Chimichurri Sauce is bold, herbaceous, and packing a zesty punch. Perfect for grilled meats, veggies, or even as a dipping sauce!
    Like
    Love
    Wow
    3
    · 0 Comments ·0 Shares ·30K Views
  • Beef and Bell Pepper Pasta

    Savory Beef and Sweet Bell Pepper Tagliatelle

    Ingredients:

    8 oz tagliatelle or fettuccine pasta

    1 tablespoon olive oil

    1 pound ground beef

    1 red bell pepper, sliced thin

    1 yellow bell pepper, sliced thin

    1 green bell pepper, sliced thin

    1 small onion, finely chopped

    3 cloves garlic, minced

    1 teaspoon dried oregano

    1/2 teaspoon crushed red pepper flakes (optional)

    1/2 cup beef broth

    1/2 cup tomato passata or crushed tomatoes

    1/4 cup heavy cream

    Salt and freshly cracked black pepper to taste

    1/4 cup grated Parmesan cheese

    Fresh parsley or basil, for garnish

    Directions:

    Cook the pasta in salted boiling water according to package directions. Reserve 1/2 cup of pasta water before draining.

    In a large skillet, heat olive oil over medium heat. Add chopped onion and sauté for 2–3 minutes until soft.

    Add the garlic and cook for another 30 seconds until fragrant.

    Stir in ground beef and cook, breaking it up with a spoon, until browned and cooked through.

    Add the sliced bell peppers, oregano, and red pepper flakes. Cook for 5–7 minutes until peppers are softened.

    Pour in the beef broth and tomato passata. Simmer for 5 minutes, allowing the sauce to reduce slightly.

    Stir in the heavy cream and simmer for another 2 minutes. Season with salt and black pepper.

    Add the cooked pasta to the skillet and toss everything together. If needed, add a splash of reserved pasta water to loosen the sauce.

    Sprinkle with Parmesan and garnish with fresh herbs. Serve immediately.

    Prep Time: 10 minutes | Cooking Time: 20 minutes | Total Time: 30 minutes
    Kcal: 540 kcal | Servings: 4 servings

    #beefrecipes #pastadinner #bellpeppers #beefpasta #comfortfood #italianinspired #easymeals #weeknightdinner #homemadepasta #groundbeefrecipes #onepanmeals #savorydishes #tagliatelle #creamybeefpasta #familymeals #quickdinner #pastaideas #dinnerrecipes #freshingredients #cheesypasta

    Hearty, colorful, and packed with flavor! Try this creamy Beef and Bell Pepper Pasta for your next cozy dinner. It's rich, satisfying, and done in 30 minutes!
    Beef and Bell Pepper Pasta Savory Beef and Sweet Bell Pepper Tagliatelle Ingredients: 8 oz tagliatelle or fettuccine pasta 1 tablespoon olive oil 1 pound ground beef 1 red bell pepper, sliced thin 1 yellow bell pepper, sliced thin 1 green bell pepper, sliced thin 1 small onion, finely chopped 3 cloves garlic, minced 1 teaspoon dried oregano 1/2 teaspoon crushed red pepper flakes (optional) 1/2 cup beef broth 1/2 cup tomato passata or crushed tomatoes 1/4 cup heavy cream Salt and freshly cracked black pepper to taste 1/4 cup grated Parmesan cheese Fresh parsley or basil, for garnish Directions: Cook the pasta in salted boiling water according to package directions. Reserve 1/2 cup of pasta water before draining. In a large skillet, heat olive oil over medium heat. Add chopped onion and sauté for 2–3 minutes until soft. Add the garlic and cook for another 30 seconds until fragrant. Stir in ground beef and cook, breaking it up with a spoon, until browned and cooked through. Add the sliced bell peppers, oregano, and red pepper flakes. Cook for 5–7 minutes until peppers are softened. Pour in the beef broth and tomato passata. Simmer for 5 minutes, allowing the sauce to reduce slightly. Stir in the heavy cream and simmer for another 2 minutes. Season with salt and black pepper. Add the cooked pasta to the skillet and toss everything together. If needed, add a splash of reserved pasta water to loosen the sauce. Sprinkle with Parmesan and garnish with fresh herbs. Serve immediately. Prep Time: 10 minutes | Cooking Time: 20 minutes | Total Time: 30 minutes Kcal: 540 kcal | Servings: 4 servings #beefrecipes #pastadinner #bellpeppers #beefpasta #comfortfood #italianinspired #easymeals #weeknightdinner #homemadepasta #groundbeefrecipes #onepanmeals #savorydishes #tagliatelle #creamybeefpasta #familymeals #quickdinner #pastaideas #dinnerrecipes #freshingredients #cheesypasta Hearty, colorful, and packed with flavor! Try this creamy Beef and Bell Pepper Pasta for your next cozy dinner. It's rich, satisfying, and done in 30 minutes!
    Like
    Love
    Wow
    3
    · 0 Comments ·0 Shares ·30K Views
More Results