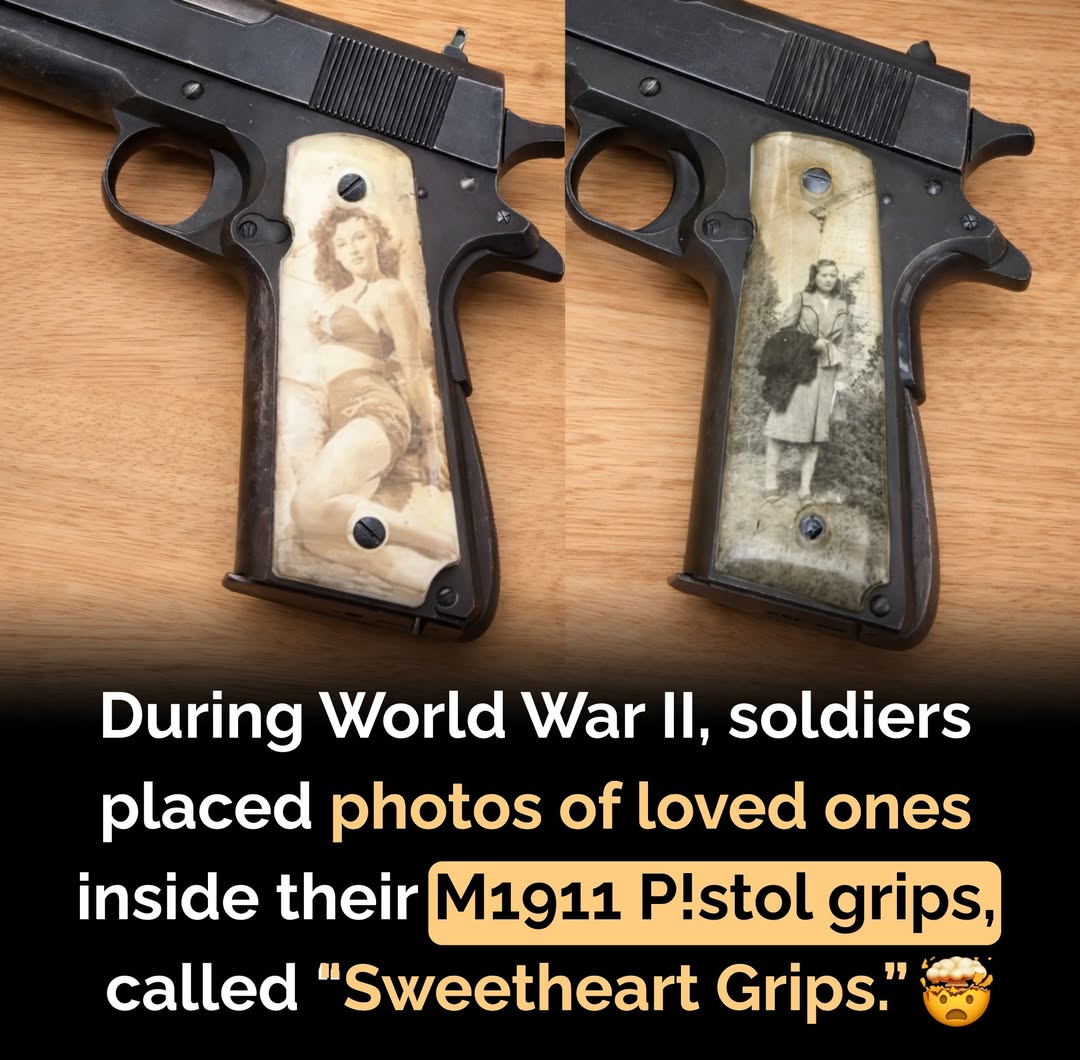
• Suzuki has just introduced the Moorai, a $3,000 robotic transport dog designed to redefine personal mobility. This futuristic machine is part of Suzuki’s push toward intelligent robotic platforms and was showcased at the Japan Mobility Show as a bold statement of innovation. With a form inspired by canine agility and robotic strength, the Moorai allows users to sit atop and be transported autonomously across varied terrain—blending entertainment, convenience, and high-tech design in one compact, functional ride.

    Built on technology derived from Suzuki’s more advanced MOQBA platform, the Moorai is ideal for both everyday fun and practical short-range mobility. Its quadrupedal design allows it to navigate uneven paths, indoor environments, or even emergency zones, offering hands-free transit at speeds up to 20 mph. At just $3,000, it's one of the most accessible robotic mobility systems available—and marks the dawn of robotic pets you can actually ride.

    #SuzukiInnovation #RoboticMobility #TechFuture #AITransportation
    #NextGenRobots
    Suzuki has just introduced the Moorai, a $3,000 robotic transport dog designed to redefine personal mobility. This futuristic machine is part of Suzuki’s push toward intelligent robotic platforms and was showcased at the Japan Mobility Show as a bold statement of innovation. With a form inspired by canine agility and robotic strength, the Moorai allows users to sit atop and be transported autonomously across varied terrain—blending entertainment, convenience, and high-tech design in one compact, functional ride. Built on technology derived from Suzuki’s more advanced MOQBA platform, the Moorai is ideal for both everyday fun and practical short-range mobility. Its quadrupedal design allows it to navigate uneven paths, indoor environments, or even emergency zones, offering hands-free transit at speeds up to 20 mph. At just $3,000, it's one of the most accessible robotic mobility systems available—and marks the dawn of robotic pets you can actually ride. #SuzukiInnovation #RoboticMobility #TechFuture #AITransportation #NextGenRobots
    0 Comments 0 Shares 23K Views
  • Spanish Flan

    Classic Spanish Flan with Silky Caramel Topping

    Ingredients:

    1 cup granulated sugar (for caramel)

    1/4 cup water (for caramel)

    1 (14 oz) can sweetened condensed milk

    1 (12 oz) can evaporated milk

    3 large eggs

    1 tablespoon vanilla extract

    Pinch of salt

    Directions:

    Preheat oven to 350°F (175°C).

    In a small saucepan over medium heat, combine sugar and water. Stir gently until the sugar dissolves, then allow it to boil without stirring until it turns deep amber in color, about 8–10 minutes.

    Carefully pour the hot caramel into the bottom of a round 8-inch cake pan or flan mold. Tilt to coat the bottom evenly. Set aside to cool and harden.

    In a blender, combine sweetened condensed milk, evaporated milk, eggs, vanilla, and a pinch of salt. Blend until smooth.

    Pour the custard mixture over the hardened caramel in the pan.

    Place the filled pan in a larger baking dish. Pour hot water into the outer dish to create a water bath, reaching halfway up the sides of the flan pan.

    Bake for 50–60 minutes, or until the flan is set but slightly jiggly in the center.

    Let cool to room temperature, then refrigerate for at least 4 hours or overnight.

    To serve, run a knife around the edges of the flan and invert onto a serving plate, allowing the caramel to drizzle over the top.

    Prep Time: 15 minutes | Cooking Time: 1 hour | Cooling + Chill Time: 4 hours | Total Time: 5 hours 15 minutes
    Kcal: 275 kcal | Servings: 8 servings

    #spanishflan #carameldessert #classicflan #custardflan #homemadeflan #easydesserts #latinodesserts #sweetcustard #flanrecipe #creamyflan #dessertlover #traditionalflan #comfortdessert #sweetspanishdish #vanillacustard #bakingjoy #flanperfection #richandcreamy #silkycustard #dessertmagic

    A spoonful of heaven! This Classic Spanish Flan is creamy, dreamy, and topped with golden caramel. The perfect make-ahead dessert!
    Spanish Flan Classic Spanish Flan with Silky Caramel Topping Ingredients: 1 cup granulated sugar (for caramel) 1/4 cup water (for caramel) 1 (14 oz) can sweetened condensed milk 1 (12 oz) can evaporated milk 3 large eggs 1 tablespoon vanilla extract Pinch of salt Directions: Preheat oven to 350°F (175°C). In a small saucepan over medium heat, combine sugar and water. Stir gently until the sugar dissolves, then allow it to boil without stirring until it turns deep amber in color, about 8–10 minutes. Carefully pour the hot caramel into the bottom of a round 8-inch cake pan or flan mold. Tilt to coat the bottom evenly. Set aside to cool and harden. In a blender, combine sweetened condensed milk, evaporated milk, eggs, vanilla, and a pinch of salt. Blend until smooth. Pour the custard mixture over the hardened caramel in the pan. Place the filled pan in a larger baking dish. Pour hot water into the outer dish to create a water bath, reaching halfway up the sides of the flan pan. Bake for 50–60 minutes, or until the flan is set but slightly jiggly in the center. Let cool to room temperature, then refrigerate for at least 4 hours or overnight. To serve, run a knife around the edges of the flan and invert onto a serving plate, allowing the caramel to drizzle over the top. Prep Time: 15 minutes | Cooking Time: 1 hour | Cooling + Chill Time: 4 hours | Total Time: 5 hours 15 minutes Kcal: 275 kcal | Servings: 8 servings #spanishflan #carameldessert #classicflan #custardflan #homemadeflan #easydesserts #latinodesserts #sweetcustard #flanrecipe #creamyflan #dessertlover #traditionalflan #comfortdessert #sweetspanishdish #vanillacustard #bakingjoy #flanperfection #richandcreamy #silkycustard #dessertmagic A spoonful of heaven! This Classic Spanish Flan is creamy, dreamy, and topped with golden caramel. The perfect make-ahead dessert!
    0 Comments 0 Shares 23K Views
  • Cozy up with a bowl of Keto Beef & Cabbage Soup, a hearty dish that's low-carb, packed with protein, and utterly delicious! #Keto #HealthyEating #SoupSeason #ComfortFood #MealPrep

    Ingredients:
    - 1 pound ground beef
    - 1 medium onion, diced
    - 2 cloves garlic, minced
    - 4 cups beef broth
    - 4 cups cabbage, chopped
    - 1 teaspoon salt
    - 1/2 teaspoon black pepper
    - 1 teaspoon dried thyme
    - 1 teaspoon paprika

    Directions:
    Start by browning the ground beef in a large pot over medium heat. Cook it until it's no longer pink, then drain any excess fat! Add in the diced onion and minced garlic, giving it a good sauté until the onion turns beautifully translucent. Now, it’s time for the magic—pour in the beef broth and bring everything to a rolling boil. Stir in the chopped cabbage along with the salt, pepper, thyme, and paprika. Lower the heat and let it simmer away for 20-25 minutes, until the cabbage is tender and flavors meld deliciously together. Serve it hot, and enjoy every comforting bite!

    Nutrition Facts (per serving):
    - Serving Size: 1 cup
    - Calories: 280
    - Protein: 25g
    - Fat: 18g
    - Carbohydrates: 8g
    - Fiber: 3g

    Now, grab your bowl and dig in! This soup is perfect for meal prep or a cozy family dinner. Enjoy!
    Cozy up with a bowl of Keto Beef & Cabbage Soup, a hearty dish that's low-carb, packed with protein, and utterly delicious! #Keto #HealthyEating #SoupSeason #ComfortFood #MealPrep Ingredients: - 1 pound ground beef - 1 medium onion, diced - 2 cloves garlic, minced - 4 cups beef broth - 4 cups cabbage, chopped - 1 teaspoon salt - 1/2 teaspoon black pepper - 1 teaspoon dried thyme - 1 teaspoon paprika Directions: Start by browning the ground beef in a large pot over medium heat. Cook it until it's no longer pink, then drain any excess fat! Add in the diced onion and minced garlic, giving it a good sauté until the onion turns beautifully translucent. Now, it’s time for the magic—pour in the beef broth and bring everything to a rolling boil. Stir in the chopped cabbage along with the salt, pepper, thyme, and paprika. Lower the heat and let it simmer away for 20-25 minutes, until the cabbage is tender and flavors meld deliciously together. Serve it hot, and enjoy every comforting bite! Nutrition Facts (per serving): - Serving Size: 1 cup - Calories: 280 - Protein: 25g - Fat: 18g - Carbohydrates: 8g - Fiber: 3g Now, grab your bowl and dig in! This soup is perfect for meal prep or a cozy family dinner. Enjoy!
    0 Comments 0 Shares 22K Views
  • Looking for a delightful flaky crust that fits your keto lifestyle? This Flaky Keto Pie Crust is just what you need for all your favorite sweet and savory pies! #KetoRecipes #LowCarb #BakingAtHome #HealthyEating #PieLove

    **Ingredients:**
    - 1 1⁄2 cups almond flour
    - 1⁄2 cup coconut flour
    - 1 teaspoon salt
    - 1 teaspoon xanthan gum
    - 1⁄2 cup unsalted butter, cold and cubed
    - 1 large egg
    - 2 tablespoons apple cider vinegar
    - 2 to 4 tablespoons cold water

    **Directions:**
    1. Let’s kick things off by grabbing a large mixing bowl. Toss in the almond flour, coconut flour, salt, and xanthan gum. Give it a good mix to ensure everything is well blended.
    2. Next up, add those cold, cubed butter pieces into the flour mixture. You can either use a pastry cutter or your fingertips to blend it in, breaking up the butter until the mixture resembles coarse crumbs. Yum!
    3. In a separate bowl, whisk together the egg and apple cider vinegar until frothy.
    4. Now, pour that egg mixture into your flour blend, and stir it all together until it starts to come together.
    5. It’s time to add some cold water! Gradually mix in 2 to 4 tablespoons, one at a time, until the dough is cohesive but not sticky.
    6. Roll the dough into a ball, wrap it up in plastic wrap, and let it chill in the fridge for at least 30 minutes. This is where the magic happens!
    7. Preheat your oven to 350°F (175°C) while you wait.
    8. Take that chilled dough and roll it out between two sheets of parchment paper until it’s the perfect size for your pie dish.
    9. Transfer the rolled-out dough to your pie dish, trim any excess hanging over the edges, and prick the bottom with a fork to prevent bubbling – trust me, your future pie will thank you!
    10. Bake the crust for 10-12 minutes until it’s lightly golden. Remove it from the oven and let it cool before you fill it with your favorite goodies!

    **Nutritional Facts** (per serving):
    - Calories: 180
    - Protein: 4g
    - Fat: 16g
    - Carbohydrates: 5g
    - Fiber: 3g
    - Net Carbs: 2g

    **Serving Size:**
    One slice of pie (assuming 8 slices from one pie).

    Now you’re all set to enjoy a delicious low-carb treat! Happy baking!
    Looking for a delightful flaky crust that fits your keto lifestyle? This Flaky Keto Pie Crust is just what you need for all your favorite sweet and savory pies! #KetoRecipes #LowCarb #BakingAtHome #HealthyEating #PieLove **Ingredients:** - 1 1⁄2 cups almond flour - 1⁄2 cup coconut flour - 1 teaspoon salt - 1 teaspoon xanthan gum - 1⁄2 cup unsalted butter, cold and cubed - 1 large egg - 2 tablespoons apple cider vinegar - 2 to 4 tablespoons cold water **Directions:** 1. Let’s kick things off by grabbing a large mixing bowl. Toss in the almond flour, coconut flour, salt, and xanthan gum. Give it a good mix to ensure everything is well blended. 2. Next up, add those cold, cubed butter pieces into the flour mixture. You can either use a pastry cutter or your fingertips to blend it in, breaking up the butter until the mixture resembles coarse crumbs. Yum! 3. In a separate bowl, whisk together the egg and apple cider vinegar until frothy. 4. Now, pour that egg mixture into your flour blend, and stir it all together until it starts to come together. 5. It’s time to add some cold water! Gradually mix in 2 to 4 tablespoons, one at a time, until the dough is cohesive but not sticky. 6. Roll the dough into a ball, wrap it up in plastic wrap, and let it chill in the fridge for at least 30 minutes. This is where the magic happens! 7. Preheat your oven to 350°F (175°C) while you wait. 8. Take that chilled dough and roll it out between two sheets of parchment paper until it’s the perfect size for your pie dish. 9. Transfer the rolled-out dough to your pie dish, trim any excess hanging over the edges, and prick the bottom with a fork to prevent bubbling – trust me, your future pie will thank you! 10. Bake the crust for 10-12 minutes until it’s lightly golden. Remove it from the oven and let it cool before you fill it with your favorite goodies! **Nutritional Facts** (per serving): - Calories: 180 - Protein: 4g - Fat: 16g - Carbohydrates: 5g - Fiber: 3g - Net Carbs: 2g **Serving Size:** One slice of pie (assuming 8 slices from one pie). Now you’re all set to enjoy a delicious low-carb treat! Happy baking!
    0 Comments 0 Shares 23K Views
  • Guess some places are just... magically exempt
    Guess some places are just... magically exempt
    0 Comments 0 Shares 23K Views
More Results