Global Baking Molds And Trays Market Industry – Key Players, Size, Trends, Opportunities, Growth- Analysis to 2025-2034
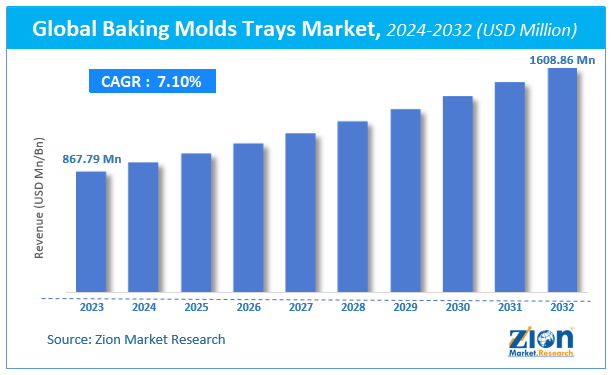
The global Baking Molds And Trays Market is expected to reach USD 1.61 Biliion by the end of 2032, with a valuation of USD 0.87 Biliion in 2023, according to a report released by Zion Market Research. Over the course of the projected period, the market is anticipated to expand at a CAGR of 7.1%.
Get FULL Report Now with Discount: https://www.zionmarketresearch.com/report/baking-molds-trays-market
Global Baking Molds And Trays Market Industry – Key Players, Size, Trends, Opportunities, Growth- Analysis to 2025-2034
The global Baking Molds And Trays Market is expected to reach USD 1.61 Biliion by the end of 2032, with a valuation of USD 0.87 Biliion in 2023, according to a report released by Zion Market Research. Over the course of the projected period, the market is anticipated to expand at a CAGR of 7.1%.
Get FULL Report Now with Discount: https://www.zionmarketresearch.com/report/baking-molds-trays-market
0 Commenti
0 condivisioni
901 Views
0 Anteprima