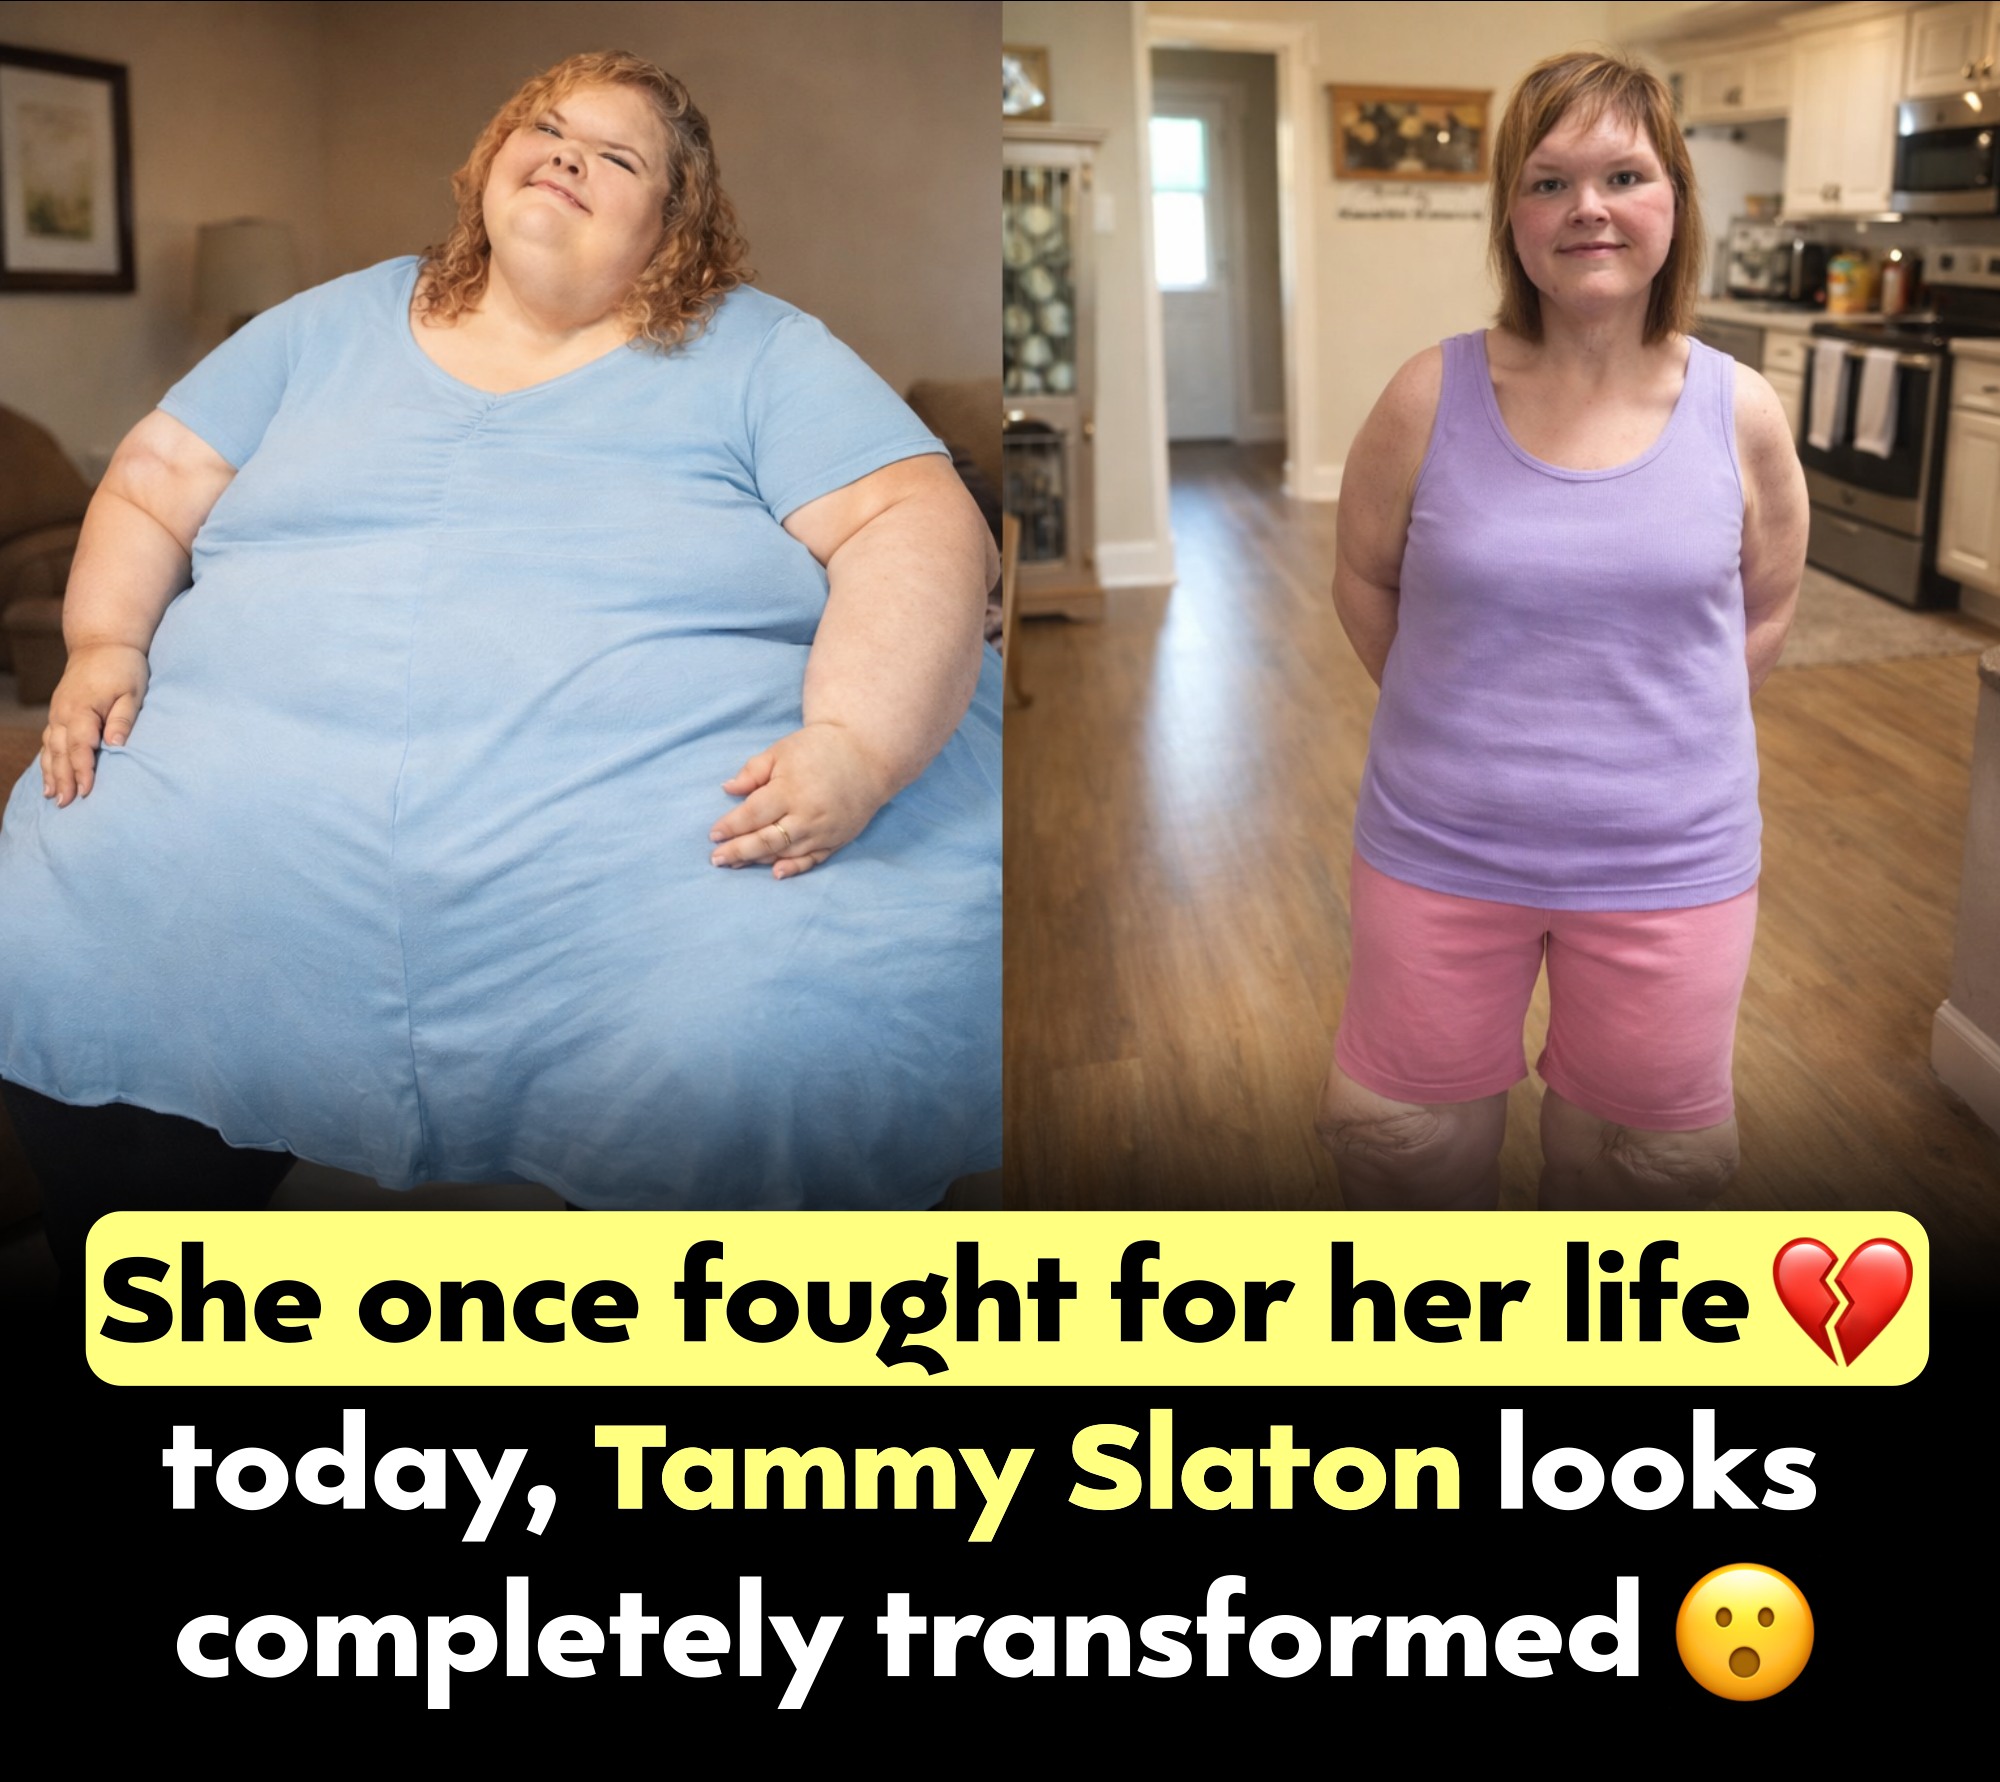
• Looking for a quick and delicious dinner? This Black Pepper Chicken with Mushrooms is bursting with flavor and takes just 20 minutes to whip up!

    Ingredients:
    - 1 pound boneless, skinless chicken thighs, cut into bite-sized pieces
    - 8 ounces mushrooms, sliced (button or cremini)
    - 3 tablespoons olive oil
    - 1 tablespoon soy sauce (or use coconut aminos for a soy-free twist)
    - 1 tablespoon apple cider vinegar
    - 2 teaspoons freshly ground black pepper

    Directions:
    1. Heat the olive oil in a large skillet over medium-high heat. Once it’s nice and hot, toss in the chicken pieces. Cook them until they're beautifully browned and cooked through, which should take about 5-7 minutes.
    2. Next, add those sliced mushrooms to the skillet and sauté them for about 3-4 minutes, or until they’re softened and starting to release their juices.
    3. Now it’s time to bring the flavor! Stir in the soy sauce, apple cider vinegar, and freshly ground black pepper. Let everything simmer together for another 2 minutes, allowing those amazing flavors to meld.
    4. Serve this savory dish hot with a side of rice or noodles for a satisfying meal!

    Nutritional Values (per serving):
    - Serving Size: 1/4 of the recipe
    - Calories: Approx. 290
    - Protein: 25g
    - Fat: 17g
    - Carbohydrates: 7g
    - Fiber: 1g

    Get ready to impress your taste buds with this easy Black Pepper Chicken with Mushrooms! #DinnerInMinutes #ChickenRecipe #EasyCooking #HealthyEats #FoodieFavorites
    Looking for a quick and delicious dinner? This Black Pepper Chicken with Mushrooms is bursting with flavor and takes just 20 minutes to whip up! Ingredients: - 1 pound boneless, skinless chicken thighs, cut into bite-sized pieces - 8 ounces mushrooms, sliced (button or cremini) - 3 tablespoons olive oil - 1 tablespoon soy sauce (or use coconut aminos for a soy-free twist) - 1 tablespoon apple cider vinegar - 2 teaspoons freshly ground black pepper Directions: 1. Heat the olive oil in a large skillet over medium-high heat. Once it’s nice and hot, toss in the chicken pieces. Cook them until they're beautifully browned and cooked through, which should take about 5-7 minutes. 2. Next, add those sliced mushrooms to the skillet and sauté them for about 3-4 minutes, or until they’re softened and starting to release their juices. 3. Now it’s time to bring the flavor! Stir in the soy sauce, apple cider vinegar, and freshly ground black pepper. Let everything simmer together for another 2 minutes, allowing those amazing flavors to meld. 4. Serve this savory dish hot with a side of rice or noodles for a satisfying meal! Nutritional Values (per serving): - Serving Size: 1/4 of the recipe - Calories: Approx. 290 - Protein: 25g - Fat: 17g - Carbohydrates: 7g - Fiber: 1g Get ready to impress your taste buds with this easy Black Pepper Chicken with Mushrooms! #DinnerInMinutes #ChickenRecipe #EasyCooking #HealthyEats #FoodieFavorites
    0 Comentários 0 Compartilhamentos 20KB Visualizações
  • Peanut Butter Cup Ice Cream

    Creamy Peanut Butter Cup Explosion Ice Cream

    Ingredients:

    2 cups heavy cream

    1 cup whole milk

    3/4 cup granulated sugar

    1/2 cup creamy peanut butter

    1 tsp vanilla extract

    Pinch of salt

    1 1/2 cups chopped peanut butter cups (Reese’s or similar)

    Directions:

    In a mixing bowl, whisk together the heavy cream, milk, sugar, peanut butter, vanilla extract, and salt until smooth and fully combined.

    Cover and refrigerate the mixture for at least 2 hours, or overnight for richer flavor.

    Once chilled, pour into your ice cream maker and churn according to the manufacturer’s instructions (typically 20–25 minutes).

    In the last 5 minutes of churning, add the chopped peanut butter cups so they mix evenly into the ice cream.

    Transfer the ice cream to a freezer-safe container and freeze for at least 4 hours or until firm.

    Scoop and serve with extra peanut butter cup chunks on top if desired.

    Prep Time: 10 minutes | Chilling Time: 2 hours | Churning Time: 25 minutes | Freezing Time: 4 hours | Total Time: 6 hours 35 minutes

    Kcal: 360 kcal | Servings: 8 servings

    #icecreamaddict #peanutbutterlove #homemadedesserts #icecreamcravings #reeseicecream #frozentreats #sweetindulgence #peanutbuttercups #icecreamparty #creamyicecream #easyicecreamrecipe #homemadesweets #dessertideas #icecreamlover #nobakedessert #icecreamtime #scoopszn #decadentdesserts #coldtreats #dessertgoals

    Craving something creamy, nutty, and chocolatey? This Peanut Butter Cup Ice Cream is an indulgent dream in every scoop!
    Peanut Butter Cup Ice Cream Creamy Peanut Butter Cup Explosion Ice Cream Ingredients: 2 cups heavy cream 1 cup whole milk 3/4 cup granulated sugar 1/2 cup creamy peanut butter 1 tsp vanilla extract Pinch of salt 1 1/2 cups chopped peanut butter cups (Reese’s or similar) Directions: In a mixing bowl, whisk together the heavy cream, milk, sugar, peanut butter, vanilla extract, and salt until smooth and fully combined. Cover and refrigerate the mixture for at least 2 hours, or overnight for richer flavor. Once chilled, pour into your ice cream maker and churn according to the manufacturer’s instructions (typically 20–25 minutes). In the last 5 minutes of churning, add the chopped peanut butter cups so they mix evenly into the ice cream. Transfer the ice cream to a freezer-safe container and freeze for at least 4 hours or until firm. Scoop and serve with extra peanut butter cup chunks on top if desired. Prep Time: 10 minutes | Chilling Time: 2 hours | Churning Time: 25 minutes | Freezing Time: 4 hours | Total Time: 6 hours 35 minutes Kcal: 360 kcal | Servings: 8 servings #icecreamaddict #peanutbutterlove #homemadedesserts #icecreamcravings #reeseicecream #frozentreats #sweetindulgence #peanutbuttercups #icecreamparty #creamyicecream #easyicecreamrecipe #homemadesweets #dessertideas #icecreamlover #nobakedessert #icecreamtime #scoopszn #decadentdesserts #coldtreats #dessertgoals Craving something creamy, nutty, and chocolatey? This Peanut Butter Cup Ice Cream is an indulgent dream in every scoop!
    0 Comentários 0 Compartilhamentos 20KB Visualizações
  • In a milestone moment for Chinese space tech, Beijing-based startup Space Epoch has successfully completed a vertical sea recovery test of its reusable rocket prototype. This marks one of China’s first sea-based demonstrations for reusable launch vehicles—mimicking techniques pioneered by SpaceX.

    What Happened?

    The test involved launching and vertically landing the rocket booster over the ocean.

    It showcased the booster’s ability to hover, descend, and stabilize autonomously despite marine conditions.

    Why It Matters:

    Ocean-based recovery allows for flexible launch sites and reduces land-use constraints.

    Reusability could cut launch costs by up to 70%, opening doors for more frequent commercial satellite deployments.

    China aims to compete directly with SpaceX’s Falcon 9 in the global launch market.

    The successful test highlights China’s increasing focus on private-sector innovation in aerospace, with Space Epoch leading the charge in orbital reusability.

    #ChinaSpace #ReusableRockets #SpaceEpoch #TechExplorers #OceanLanding #SpaceInnovation #NewSpaceRace
    In a milestone moment for Chinese space tech, Beijing-based startup Space Epoch has successfully completed a vertical sea recovery test of its reusable rocket prototype. This marks one of China’s first sea-based demonstrations for reusable launch vehicles—mimicking techniques pioneered by SpaceX. What Happened? The test involved launching and vertically landing the rocket booster over the ocean. It showcased the booster’s ability to hover, descend, and stabilize autonomously despite marine conditions. Why It Matters: Ocean-based recovery allows for flexible launch sites and reduces land-use constraints. Reusability could cut launch costs by up to 70%, opening doors for more frequent commercial satellite deployments. China aims to compete directly with SpaceX’s Falcon 9 in the global launch market. The successful test highlights China’s increasing focus on private-sector innovation in aerospace, with Space Epoch leading the charge in orbital reusability. #ChinaSpace #ReusableRockets #SpaceEpoch #TechExplorers #OceanLanding #SpaceInnovation #NewSpaceRace
    0 Comentários 0 Compartilhamentos 20KB Visualizações
  • Baked Ziti with Mozzarella

    Cheesy Baked Ziti with Melted Mozzarella and Rich Tomato Sauce

    Ingredients:

    1 lb (450g) ziti pasta

    2 cups marinara sauce (homemade or store-bought)

    1 lb (450g) ground beef or Italian sausage

    2 cups shredded mozzarella cheese

    1 cup ricotta cheese

    1/2 cup grated Parmesan cheese

    2 cloves garlic, minced

    1 small onion, finely chopped

    2 tablespoons olive oil

    1 teaspoon dried Italian herbs (oregano, basil, thyme)

    Salt and pepper to taste

    Fresh basil or parsley for garnish (optional)

    Directions:

    Preheat oven to 375°F (190°C).

    Cook ziti pasta according to package instructions until al dente. Drain and set aside.

    In a large skillet, heat olive oil over medium heat. Add onion and garlic; sauté until translucent, about 3-4 minutes.

    Add ground beef or Italian sausage, season with salt, pepper, and Italian herbs. Cook until browned and cooked through, about 7-8 minutes. Drain excess fat if needed.

    Stir in marinara sauce and simmer for 5 minutes to combine flavors.

    In a large mixing bowl, combine cooked pasta, meat sauce, and ricotta cheese. Mix well.

    Transfer half of the pasta mixture to a greased 9x13-inch baking dish. Sprinkle with half of the mozzarella cheese and some Parmesan.

    Layer the remaining pasta mixture on top, then sprinkle with the remaining mozzarella and Parmesan cheese.

    Cover with foil and bake for 20 minutes. Remove foil and bake an additional 10 minutes until cheese is melted and bubbly with golden spots.

    Garnish with fresh basil or parsley if desired. Serve hot.

    Prep Time: 15 minutes | Cooking Time: 40 minutes | Total Time: 55 minutes

    Kcal: 650 kcal per serving | Servings: 6 servings

    #bakedziti #italiancomfortfood #cheesypasta #mozarellapasta #homemadeitalian #comfortfoodrecipes #pastaovenbake #heartymeals #familydinner #easydinnerrecipes #italianrecipes #pastaandcheese #weeknightdinner #ricottacheese #groundbeefrecipes #italiandish #tomatosauce #pastafood #cheeselover #homecooking

    Indulge in this classic Baked Ziti with Mozzarella—layers of cheesy goodness and rich meat sauce baked to bubbly perfection! Perfect for family dinners!
    Baked Ziti with Mozzarella Cheesy Baked Ziti with Melted Mozzarella and Rich Tomato Sauce Ingredients: 1 lb (450g) ziti pasta 2 cups marinara sauce (homemade or store-bought) 1 lb (450g) ground beef or Italian sausage 2 cups shredded mozzarella cheese 1 cup ricotta cheese 1/2 cup grated Parmesan cheese 2 cloves garlic, minced 1 small onion, finely chopped 2 tablespoons olive oil 1 teaspoon dried Italian herbs (oregano, basil, thyme) Salt and pepper to taste Fresh basil or parsley for garnish (optional) Directions: Preheat oven to 375°F (190°C). Cook ziti pasta according to package instructions until al dente. Drain and set aside. In a large skillet, heat olive oil over medium heat. Add onion and garlic; sauté until translucent, about 3-4 minutes. Add ground beef or Italian sausage, season with salt, pepper, and Italian herbs. Cook until browned and cooked through, about 7-8 minutes. Drain excess fat if needed. Stir in marinara sauce and simmer for 5 minutes to combine flavors. In a large mixing bowl, combine cooked pasta, meat sauce, and ricotta cheese. Mix well. Transfer half of the pasta mixture to a greased 9x13-inch baking dish. Sprinkle with half of the mozzarella cheese and some Parmesan. Layer the remaining pasta mixture on top, then sprinkle with the remaining mozzarella and Parmesan cheese. Cover with foil and bake for 20 minutes. Remove foil and bake an additional 10 minutes until cheese is melted and bubbly with golden spots. Garnish with fresh basil or parsley if desired. Serve hot. Prep Time: 15 minutes | Cooking Time: 40 minutes | Total Time: 55 minutes Kcal: 650 kcal per serving | Servings: 6 servings #bakedziti #italiancomfortfood #cheesypasta #mozarellapasta #homemadeitalian #comfortfoodrecipes #pastaovenbake #heartymeals #familydinner #easydinnerrecipes #italianrecipes #pastaandcheese #weeknightdinner #ricottacheese #groundbeefrecipes #italiandish #tomatosauce #pastafood #cheeselover #homecooking Indulge in this classic Baked Ziti with Mozzarella—layers of cheesy goodness and rich meat sauce baked to bubbly perfection! Perfect for family dinners!
    0 Comentários 0 Compartilhamentos 20KB Visualizações
  • Spiced Pickled Beets

    Sweet & Spicy Homemade Pickled Beets

    Ingredients:

    1 1/2 lbs fresh beets, trimmed and scrubbed

    1 cup apple cider vinegar

    1/2 cup water

    1/2 cup granulated sugar

    1/2 tsp ground cinnamon

    1/4 tsp ground cloves

    1/4 tsp ground allspice

    1/2 tsp salt

    1 small red onion, thinly sliced (optional)

    Directions:

    Place the beets in a large pot and cover with water. Bring to a boil and cook for 30–40 minutes, or until fork-tender.

    Drain the beets and let them cool enough to handle. Peel and slice into 1/4-inch rounds or wedges.

    In a saucepan, combine the vinegar, water, sugar, cinnamon, cloves, allspice, and salt. Bring to a gentle simmer, stirring until the sugar dissolves.

    Place the sliced beets (and red onion if using) in a sterilized glass jar.

    Pour the hot brine over the beets, making sure they are completely submerged.

    Let cool to room temperature, then seal with a lid and refrigerate for at least 24 hours before eating.

    Best enjoyed within 2–3 weeks for peak flavor and texture.

    Prep Time: 15 minutes | Cooking Time: 40 minutes | Cooling + Pickling Time: 24 hours | Total Time: 24 hours 55 minutes

    Kcal: 60 kcal per serving | Servings: 6 servings

    #pickledbeets #homemadepickles #spicedbeets #sweetandspicy #fridgepickles #beetrecipes #easyvegetables #preservingveggies #rootvegetables #homemadebrine #flavorfulsides #canningrecipes #quickpickles #fallflavors #farmersmarketfinds #tangytreats #healthycondiments #vegetarianpickles #beetsfordays #picklingseason

    These Spiced Pickled Beets are everything: sweet, tangy, and full of warm spice. Perfect on salads, sandwiches, or right out of the jar!
    Spiced Pickled Beets Sweet & Spicy Homemade Pickled Beets Ingredients: 1 1/2 lbs fresh beets, trimmed and scrubbed 1 cup apple cider vinegar 1/2 cup water 1/2 cup granulated sugar 1/2 tsp ground cinnamon 1/4 tsp ground cloves 1/4 tsp ground allspice 1/2 tsp salt 1 small red onion, thinly sliced (optional) Directions: Place the beets in a large pot and cover with water. Bring to a boil and cook for 30–40 minutes, or until fork-tender. Drain the beets and let them cool enough to handle. Peel and slice into 1/4-inch rounds or wedges. In a saucepan, combine the vinegar, water, sugar, cinnamon, cloves, allspice, and salt. Bring to a gentle simmer, stirring until the sugar dissolves. Place the sliced beets (and red onion if using) in a sterilized glass jar. Pour the hot brine over the beets, making sure they are completely submerged. Let cool to room temperature, then seal with a lid and refrigerate for at least 24 hours before eating. Best enjoyed within 2–3 weeks for peak flavor and texture. Prep Time: 15 minutes | Cooking Time: 40 minutes | Cooling + Pickling Time: 24 hours | Total Time: 24 hours 55 minutes Kcal: 60 kcal per serving | Servings: 6 servings #pickledbeets #homemadepickles #spicedbeets #sweetandspicy #fridgepickles #beetrecipes #easyvegetables #preservingveggies #rootvegetables #homemadebrine #flavorfulsides #canningrecipes #quickpickles #fallflavors #farmersmarketfinds #tangytreats #healthycondiments #vegetarianpickles #beetsfordays #picklingseason These Spiced Pickled Beets are everything: sweet, tangy, and full of warm spice. Perfect on salads, sandwiches, or right out of the jar!
    0 Comentários 0 Compartilhamentos 20KB Visualizações
Páginas impulsionada