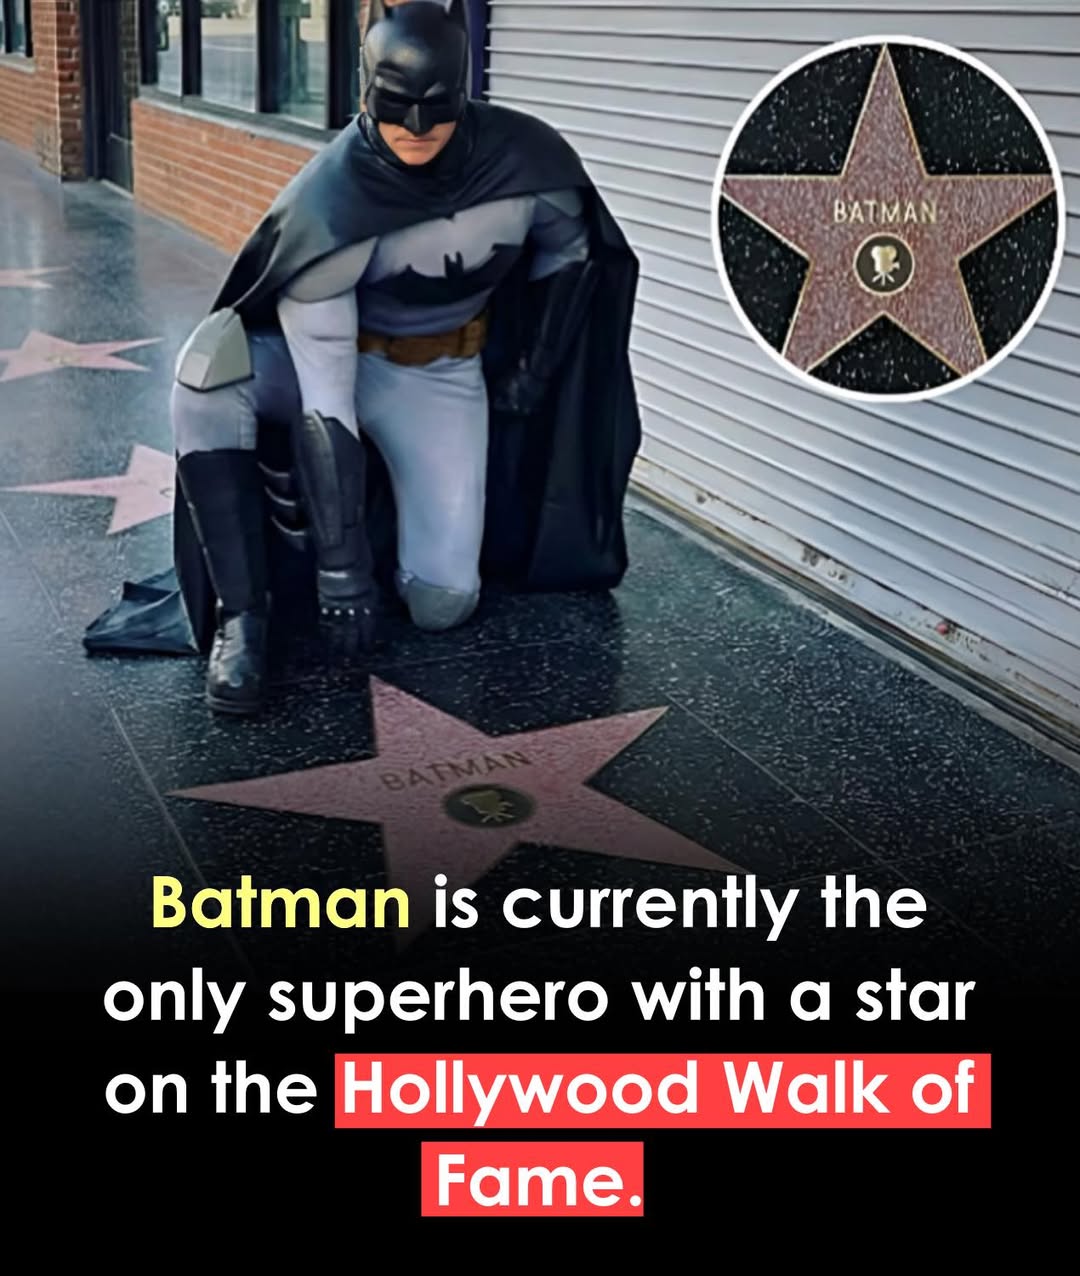
• Pesto and Ricotta Pasta

    Creamy Pesto and Ricotta Pasta with Garlic and Parmesan

    Ingredients:

    12 oz fusilli or penne pasta

    1 cup whole milk ricotta cheese

    1/2 cup basil pesto (store-bought or homemade)

    1/4 cup grated Parmesan cheese

    1/4 cup reserved pasta water

    2 garlic cloves, minced

    1 tablespoon olive oil

    Salt and black pepper to taste

    1/4 teaspoon crushed red pepper flakes (optional)

    Fresh basil leaves, for garnish

    Lemon zest (optional)

    Directions:

    Cook the pasta in salted boiling water according to package instructions. Reserve 1/4 cup of pasta water before draining.

    In a large skillet over medium heat, warm olive oil and sauté garlic for 1–2 minutes until fragrant.

    Stir in pesto and cook for another minute. Add ricotta and reserved pasta water. Stir to combine into a creamy sauce.

    Add cooked pasta to the skillet and toss to coat evenly.

    Stir in grated Parmesan, season with salt, black pepper, and red pepper flakes if desired.

    Serve warm, garnished with fresh basil leaves and a sprinkle of lemon zest for brightness.

    Prep Time: 10 minutes | Cooking Time: 15 minutes | Total Time: 25 minutes
    Kcal: Approximately 540 kcal per serving | Servings: 4 servings

    #vegetarianrecipes #pastadish #basilpesto #ricottapasta #comfortfood #quickdinnerideas #weeknightmeals #homecooked #italiandinner #freshherbs #easypasta #pestolove #parmesancheese #garlicflavor #creamyricotta #dinnerunder30 #simpleingredients #easyrecipes #pastalovers #lightdinner

    Creamy, dreamy, and bursting with basil flavor! This Pesto & Ricotta Pasta is the ultimate comfort food made easy.
    Pesto and Ricotta Pasta Creamy Pesto and Ricotta Pasta with Garlic and Parmesan Ingredients: 12 oz fusilli or penne pasta 1 cup whole milk ricotta cheese 1/2 cup basil pesto (store-bought or homemade) 1/4 cup grated Parmesan cheese 1/4 cup reserved pasta water 2 garlic cloves, minced 1 tablespoon olive oil Salt and black pepper to taste 1/4 teaspoon crushed red pepper flakes (optional) Fresh basil leaves, for garnish Lemon zest (optional) Directions: Cook the pasta in salted boiling water according to package instructions. Reserve 1/4 cup of pasta water before draining. In a large skillet over medium heat, warm olive oil and sauté garlic for 1–2 minutes until fragrant. Stir in pesto and cook for another minute. Add ricotta and reserved pasta water. Stir to combine into a creamy sauce. Add cooked pasta to the skillet and toss to coat evenly. Stir in grated Parmesan, season with salt, black pepper, and red pepper flakes if desired. Serve warm, garnished with fresh basil leaves and a sprinkle of lemon zest for brightness. Prep Time: 10 minutes | Cooking Time: 15 minutes | Total Time: 25 minutes Kcal: Approximately 540 kcal per serving | Servings: 4 servings #vegetarianrecipes #pastadish #basilpesto #ricottapasta #comfortfood #quickdinnerideas #weeknightmeals #homecooked #italiandinner #freshherbs #easypasta #pestolove #parmesancheese #garlicflavor #creamyricotta #dinnerunder30 #simpleingredients #easyrecipes #pastalovers #lightdinner Creamy, dreamy, and bursting with basil flavor! This Pesto & Ricotta Pasta is the ultimate comfort food made easy.
    Like
    1
    0 Commentarios 0 Acciones 25K Views
  • Korean Braised Chicken with Daikon Radish

    Tender Korean-Style Braised Chicken and Daikon Radish in Savory Soy Sauce

    Ingredients:

    1.5 lbs (700g) bone-in chicken thighs

    1 medium daikon radish, peeled and cut into thick chunks

    4 cloves garlic, minced

    1 small onion, sliced

    3 tablespoons soy sauce

    2 tablespoons rice wine (mirin or cooking sake)

    1 tablespoon brown sugar

    1 tablespoon sesame oil

    1 teaspoon grated ginger

    1 cup water or chicken broth

    2 green onions, chopped (for garnish)

    1 teaspoon toasted sesame seeds (optional)

    Fresh ground black pepper, to taste

    Directions:

    Heat sesame oil in a large pot or deep skillet over medium heat. Add garlic and ginger, sauté until fragrant (about 1 minute).

    Add chicken thighs and brown on both sides for about 3-4 minutes per side.

    Add sliced onions and cook until softened, about 2 minutes.

    Pour in soy sauce, rice wine, brown sugar, and water or broth. Stir well to combine.

    Add daikon chunks, cover, and bring to a simmer. Reduce heat to low and braise for 30-40 minutes until chicken is tender and daikon is soft.

    Remove the lid and increase heat slightly to reduce the sauce to a glossy, thick consistency, about 5-7 minutes. Adjust seasoning with black pepper to taste.

    Garnish with chopped green onions and sesame seeds before serving.

    Prep Time: 15 minutes | Cooking Time: 45 minutes | Total Time: 60 minutes
    Kcal: 350 kcal per serving | Servings: 4 servings

    #koreanfood #braisedchicken #daikonradish #asiancooking #comfortfood #homemadekorean #soyglazedchicken #easyweeknightdinner #slowcookedmeals #savorydishes #koreanrecipes #braisedmeat #healthycomfortfood #koreancuisine #homecookingideas #onepotmeal #tenderchicken #flavorfulfood #asianfusion #deliciousandeasy

    This Korean Braised Chicken with Daikon Radish is a warm hug in a bowl Tender chicken and soft radish slow-cooked in a savory soy glaze — perfect for cozy nights!
    Korean Braised Chicken with Daikon Radish Tender Korean-Style Braised Chicken and Daikon Radish in Savory Soy Sauce Ingredients: 1.5 lbs (700g) bone-in chicken thighs 1 medium daikon radish, peeled and cut into thick chunks 4 cloves garlic, minced 1 small onion, sliced 3 tablespoons soy sauce 2 tablespoons rice wine (mirin or cooking sake) 1 tablespoon brown sugar 1 tablespoon sesame oil 1 teaspoon grated ginger 1 cup water or chicken broth 2 green onions, chopped (for garnish) 1 teaspoon toasted sesame seeds (optional) Fresh ground black pepper, to taste Directions: Heat sesame oil in a large pot or deep skillet over medium heat. Add garlic and ginger, sauté until fragrant (about 1 minute). Add chicken thighs and brown on both sides for about 3-4 minutes per side. Add sliced onions and cook until softened, about 2 minutes. Pour in soy sauce, rice wine, brown sugar, and water or broth. Stir well to combine. Add daikon chunks, cover, and bring to a simmer. Reduce heat to low and braise for 30-40 minutes until chicken is tender and daikon is soft. Remove the lid and increase heat slightly to reduce the sauce to a glossy, thick consistency, about 5-7 minutes. Adjust seasoning with black pepper to taste. Garnish with chopped green onions and sesame seeds before serving. Prep Time: 15 minutes | Cooking Time: 45 minutes | Total Time: 60 minutes Kcal: 350 kcal per serving | Servings: 4 servings #koreanfood #braisedchicken #daikonradish #asiancooking #comfortfood #homemadekorean #soyglazedchicken #easyweeknightdinner #slowcookedmeals #savorydishes #koreanrecipes #braisedmeat #healthycomfortfood #koreancuisine #homecookingideas #onepotmeal #tenderchicken #flavorfulfood #asianfusion #deliciousandeasy This Korean Braised Chicken with Daikon Radish is a warm hug in a bowl Tender chicken and soft radish slow-cooked in a savory soy glaze — perfect for cozy nights!
    Like
    1
    0 Commentarios 0 Acciones 24K Views
  • Beef and Apple Chutney

    Seared Beef Medallions with Sweet and Tangy Apple Chutney

    Ingredients:

    1 lb beef tenderloin or sirloin, cut into medallions

    Salt and pepper, to taste

    1 tablespoon olive oil

    1 tablespoon butter

    For the Apple Chutney:

    2 apples, peeled and diced

    1/2 onion, finely chopped

    1 tablespoon fresh ginger, grated

    1/4 cup apple cider vinegar

    2 tablespoons brown sugar

    1/4 teaspoon cinnamon

    1/8 teaspoon ground cloves

    1/8 teaspoon chili flakes (optional)

    Pinch of salt

    1 tablespoon raisins (optional)

    Directions:

    Start by making the apple chutney. In a small saucepan over medium heat, combine the apples, onion, ginger, apple cider vinegar, brown sugar, cinnamon, cloves, chili flakes, and salt. Add raisins if using.

    Simmer for 15–20 minutes, stirring occasionally, until the mixture thickens and the apples are tender. Remove from heat and let cool slightly.

    Season beef medallions with salt and pepper on both sides.

    Heat olive oil and butter in a skillet over medium-high heat.

    Sear beef medallions for 3–4 minutes per side, or until desired doneness is reached. Remove from heat and rest for 5 minutes.

    Plate the beef medallions and top with a generous spoonful of warm apple chutney. Serve immediately.

    Prep Time: 10 minutes | Cooking Time: 20 minutes | Total Time: 30 minutes
    Kcal: Approximately 420 kcal per serving | Servings: 2–3 servings

    #beefrecipes #applechutney #fallflavors #savorysweet #quickdinner #meatandfruit #homemadechutney #easyentertaining #comfortfood #autumnrecipes #beefandfruit #flavorfusion #weeknightmeals #proteinrich #pansearedbeef #easydinners #dinnerinspo #foodblogger #chutneyrecipes #creativecooking

    Craving something different tonight? These Seared Beef Medallions with Apple Chutney are bursting with bold, sweet-savory flavor!
    Beef and Apple Chutney Seared Beef Medallions with Sweet and Tangy Apple Chutney Ingredients: 1 lb beef tenderloin or sirloin, cut into medallions Salt and pepper, to taste 1 tablespoon olive oil 1 tablespoon butter For the Apple Chutney: 2 apples, peeled and diced 1/2 onion, finely chopped 1 tablespoon fresh ginger, grated 1/4 cup apple cider vinegar 2 tablespoons brown sugar 1/4 teaspoon cinnamon 1/8 teaspoon ground cloves 1/8 teaspoon chili flakes (optional) Pinch of salt 1 tablespoon raisins (optional) Directions: Start by making the apple chutney. In a small saucepan over medium heat, combine the apples, onion, ginger, apple cider vinegar, brown sugar, cinnamon, cloves, chili flakes, and salt. Add raisins if using. Simmer for 15–20 minutes, stirring occasionally, until the mixture thickens and the apples are tender. Remove from heat and let cool slightly. Season beef medallions with salt and pepper on both sides. Heat olive oil and butter in a skillet over medium-high heat. Sear beef medallions for 3–4 minutes per side, or until desired doneness is reached. Remove from heat and rest for 5 minutes. Plate the beef medallions and top with a generous spoonful of warm apple chutney. Serve immediately. Prep Time: 10 minutes | Cooking Time: 20 minutes | Total Time: 30 minutes Kcal: Approximately 420 kcal per serving | Servings: 2–3 servings #beefrecipes #applechutney #fallflavors #savorysweet #quickdinner #meatandfruit #homemadechutney #easyentertaining #comfortfood #autumnrecipes #beefandfruit #flavorfusion #weeknightmeals #proteinrich #pansearedbeef #easydinners #dinnerinspo #foodblogger #chutneyrecipes #creativecooking Craving something different tonight? These Seared Beef Medallions with Apple Chutney are bursting with bold, sweet-savory flavor!
    Like
    1
    0 Commentarios 0 Acciones 24K Views
  • Get ready to indulge in a delicious Keto Caprese Chicken that’s not only hearty but also bursting with flavor! Perfect for a quick weeknight dinner or a cozy weekend meal. #KetoRecipes #HealthyEating #CapreseChicken

    Ingredients:
    - 4 boneless, skinless chicken breasts (about 1.5 pounds)
    - 2 tablespoons olive oil
    - 1 teaspoon garlic powder
    - 1 teaspoon Italian seasoning
    - Salt and pepper to taste
    - 8 ounces fresh mozzarella cheese, sliced
    - 2 cups cherry tomatoes, halved
    - 1/4 cup fresh basil leaves, chopped
    - 2 tablespoons balsamic vinegar (optional)

    Directions:
    1. Preheat your oven to a warm 400°F (200°C).
    2. Heat the olive oil in a large skillet over medium-high heat. While it’s warming up, take those chicken breasts and season them with garlic powder, Italian seasoning, salt, and pepper.
    3. Once the skillet is sizzling, add the chicken and sear for about 4-5 minutes on each side until they’re a gorgeous golden brown.
    4. Next, transfer the chicken to a baking dish. Top each breast with luscious slices of fresh mozzarella and halved cherry tomatoes.
    5. Pop it in the preheated oven and bake for 20-25 minutes, or until the chicken is cooked through and the cheese is fully melted and bubbly.
    6. When it comes out, sprinkle it with fresh basil for that lovely aroma. If you’re feeling fancy, drizzle some balsamic vinegar on top before serving.

    Nutritional Values (per serving):
    - Serving size: 1 chicken breast with toppings
    - Calories: 350
    - Protein: 30g
    - Fat: 22g
    - Carbohydrates: 6g
    - Fiber: 1g

    Enjoy every bite of this mouthwatering dish, and don’t forget to share your creation! #KetoCaprese #LowCarbLifestyle #DeliciousDinner #Foodie #Yum
    Get ready to indulge in a delicious Keto Caprese Chicken that’s not only hearty but also bursting with flavor! Perfect for a quick weeknight dinner or a cozy weekend meal. #KetoRecipes #HealthyEating #CapreseChicken Ingredients: - 4 boneless, skinless chicken breasts (about 1.5 pounds) - 2 tablespoons olive oil - 1 teaspoon garlic powder - 1 teaspoon Italian seasoning - Salt and pepper to taste - 8 ounces fresh mozzarella cheese, sliced - 2 cups cherry tomatoes, halved - 1/4 cup fresh basil leaves, chopped - 2 tablespoons balsamic vinegar (optional) Directions: 1. Preheat your oven to a warm 400°F (200°C). 2. Heat the olive oil in a large skillet over medium-high heat. While it’s warming up, take those chicken breasts and season them with garlic powder, Italian seasoning, salt, and pepper. 3. Once the skillet is sizzling, add the chicken and sear for about 4-5 minutes on each side until they’re a gorgeous golden brown. 4. Next, transfer the chicken to a baking dish. Top each breast with luscious slices of fresh mozzarella and halved cherry tomatoes. 5. Pop it in the preheated oven and bake for 20-25 minutes, or until the chicken is cooked through and the cheese is fully melted and bubbly. 6. When it comes out, sprinkle it with fresh basil for that lovely aroma. If you’re feeling fancy, drizzle some balsamic vinegar on top before serving. Nutritional Values (per serving): - Serving size: 1 chicken breast with toppings - Calories: 350 - Protein: 30g - Fat: 22g - Carbohydrates: 6g - Fiber: 1g Enjoy every bite of this mouthwatering dish, and don’t forget to share your creation! #KetoCaprese #LowCarbLifestyle #DeliciousDinner #Foodie #Yum
    Like
    1
    0 Commentarios 0 Acciones 24K Views
  • If you're craving a quick, hearty meal, this Ground Beef Taco Cabbage Skillet is your answer! Packed with flavor and easy to make, it’s perfect for busy weeknights.

    Ingredients:
    - 1 pound ground beef
    - 1 small onion, diced
    - 2 cloves garlic, minced
    - 1 teaspoon chili powder
    - 1 teaspoon cumin
    - 1 teaspoon paprika
    - 1/2 teaspoon salt
    - 1/4 teaspoon black pepper
    - 1/4 teaspoon cayenne pepper (optional)
    - 4 cups green cabbage, shredded
    - 1 cup diced tomatoes (canned or fresh)
    - 1/2 cup beef broth
    - 1 cup shredded cheddar cheese
    - 2 tablespoons olive oil
    - Chopped fresh cilantro, for garnish
    - Sour cream, for serving (optional)

    Directions:
    1. In a large skillet, heat the olive oil over medium heat. Toss in the diced onion and sauté for about 3-4 minutes until it’s nice and translucent.
    2. Next, add the minced garlic and ground beef to the skillet. Cook until the beef is wonderfully browned, breaking it apart with a spatula as you go—this should take about 5-7 minutes.
    3. Once the beef is cooked, stir in the chili powder, cumin, paprika, salt, black pepper, and cayenne pepper (if you’re feeling spicy!). Mix everything together until well combined.
    4. Now, it’s time to add the shredded cabbage, diced tomatoes, and beef broth. Give it a good stir, cover the skillet, and let it cook for about 10-15 minutes, stirring occasionally, until the cabbage is tender and full of flavor.
    5. Remove the lid and sprinkle the shredded cheddar cheese generously over the top. Cover the skillet again for a few minutes until the cheese melts into gooey goodness.
    6. Serve hot, garnished with chopped cilantro, and don’t forget a dollop of sour cream if you like!

    Nutrition Facts (per serving):
    - Serving Size: 1/4 of the recipe
    - Calories: 410
    - Protein: 30g
    - Fat: 24g
    - Carbohydrates: 12g
    - Fiber: 4g

    Enjoy this tasty skillet with your family, and watch them go back for seconds! Happy cooking!

    #TacoNight #OnePanMeal #HealthyEating #EasyRecipes #DinnerIn30Minutes
    If you're craving a quick, hearty meal, this Ground Beef Taco Cabbage Skillet is your answer! Packed with flavor and easy to make, it’s perfect for busy weeknights. Ingredients: - 1 pound ground beef - 1 small onion, diced - 2 cloves garlic, minced - 1 teaspoon chili powder - 1 teaspoon cumin - 1 teaspoon paprika - 1/2 teaspoon salt - 1/4 teaspoon black pepper - 1/4 teaspoon cayenne pepper (optional) - 4 cups green cabbage, shredded - 1 cup diced tomatoes (canned or fresh) - 1/2 cup beef broth - 1 cup shredded cheddar cheese - 2 tablespoons olive oil - Chopped fresh cilantro, for garnish - Sour cream, for serving (optional) Directions: 1. In a large skillet, heat the olive oil over medium heat. Toss in the diced onion and sauté for about 3-4 minutes until it’s nice and translucent. 2. Next, add the minced garlic and ground beef to the skillet. Cook until the beef is wonderfully browned, breaking it apart with a spatula as you go—this should take about 5-7 minutes. 3. Once the beef is cooked, stir in the chili powder, cumin, paprika, salt, black pepper, and cayenne pepper (if you’re feeling spicy!). Mix everything together until well combined. 4. Now, it’s time to add the shredded cabbage, diced tomatoes, and beef broth. Give it a good stir, cover the skillet, and let it cook for about 10-15 minutes, stirring occasionally, until the cabbage is tender and full of flavor. 5. Remove the lid and sprinkle the shredded cheddar cheese generously over the top. Cover the skillet again for a few minutes until the cheese melts into gooey goodness. 6. Serve hot, garnished with chopped cilantro, and don’t forget a dollop of sour cream if you like! Nutrition Facts (per serving): - Serving Size: 1/4 of the recipe - Calories: 410 - Protein: 30g - Fat: 24g - Carbohydrates: 12g - Fiber: 4g Enjoy this tasty skillet with your family, and watch them go back for seconds! Happy cooking! #TacoNight #OnePanMeal #HealthyEating #EasyRecipes #DinnerIn30Minutes
    Like
    1
    0 Commentarios 0 Acciones 24K Views
Resultados de la búsqueda