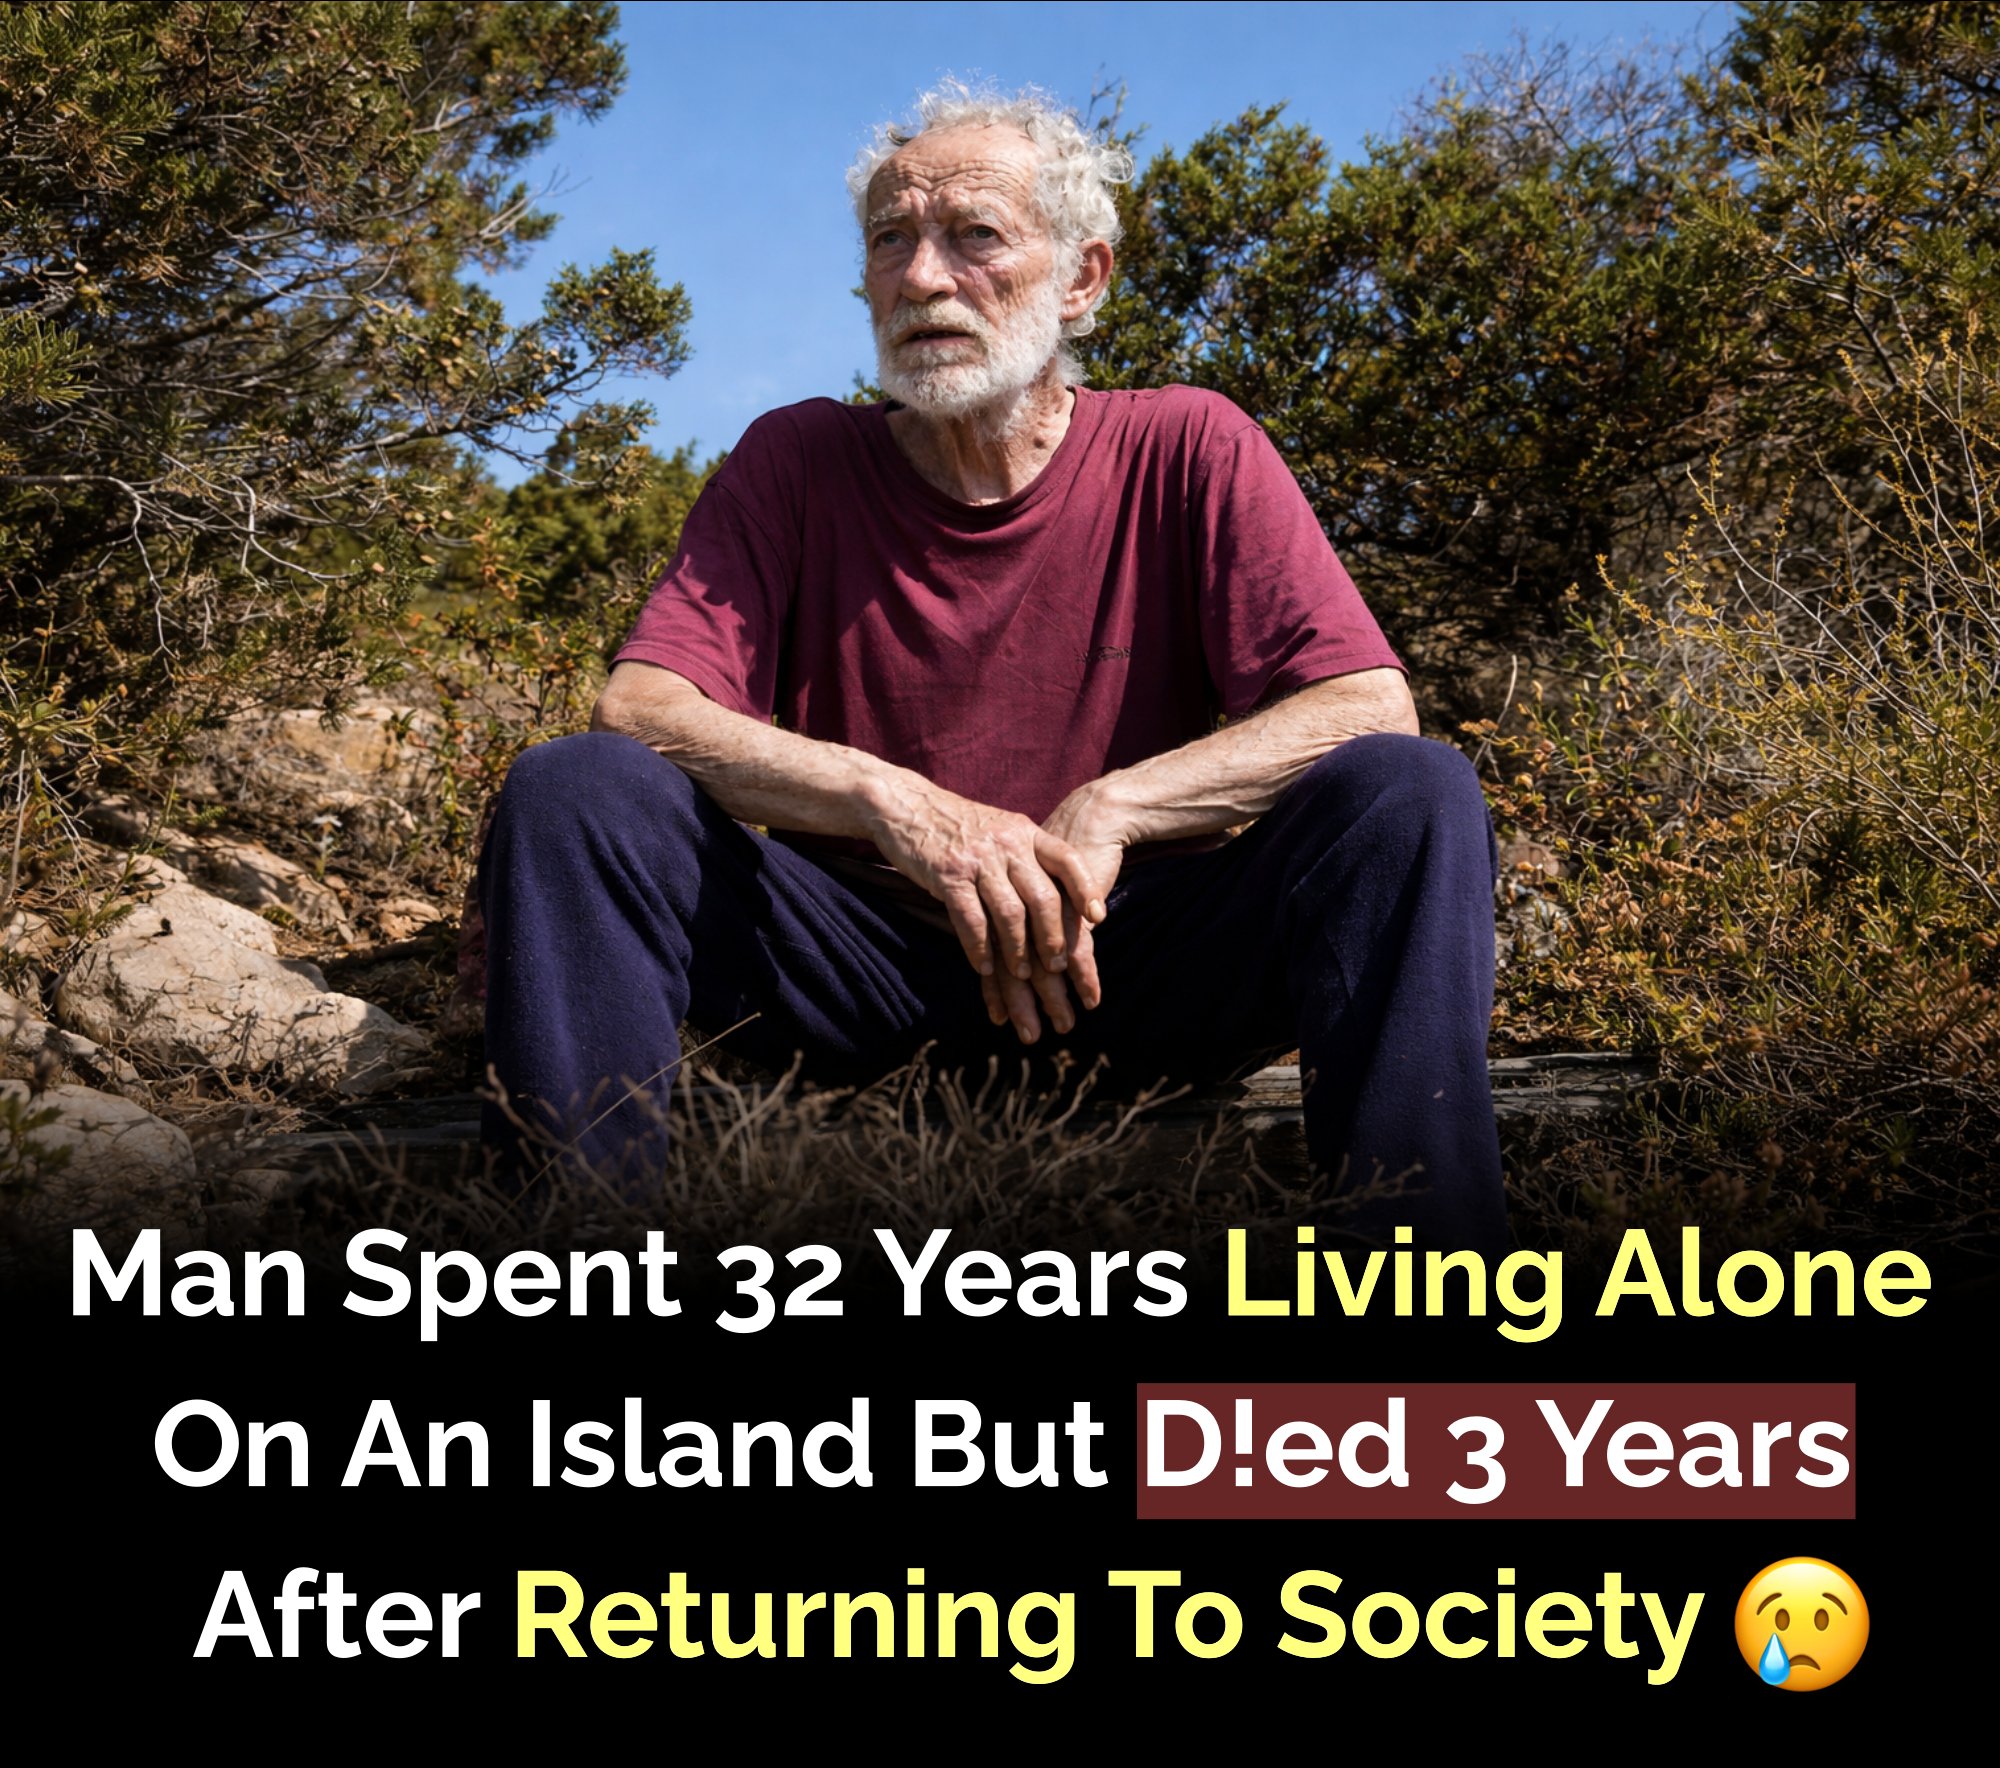
• Eggplant and Tomato Soup

    Creamy Roasted Eggplant and Tomato Soup with Herbs

    Ingredients:

    2 medium eggplants, peeled and diced

    4 large ripe tomatoes, chopped

    1 onion, chopped

    3 cloves garlic, minced

    2 tablespoons olive oil

    4 cups vegetable broth

    1 teaspoon smoked paprika

    1 teaspoon dried oregano

    Salt and freshly ground black pepper, to taste

    Fresh basil or parsley for garnish

    Directions:

    Preheat oven to 400°F (200°C). Toss diced eggplant with 1 tablespoon olive oil, salt, and pepper. Spread on a baking sheet and roast for 25-30 minutes, until tender and slightly caramelized.

    In a large pot, heat remaining olive oil over medium heat. Add onion and garlic, sauté until soft and fragrant, about 5 minutes.

    Add chopped tomatoes, roasted eggplant, smoked paprika, and oregano to the pot. Cook for 5 minutes, stirring occasionally.

    Pour in vegetable broth, bring to a boil, then reduce heat and simmer for 20 minutes to let flavors meld.

    Use an immersion blender (or transfer to a blender) to puree the soup until smooth and creamy. Adjust seasoning with salt and pepper.

    Serve hot, garnished with fresh basil or parsley.

    Prep Time: 15 minutes | Cooking Time: 50 minutes | Total Time: 65 minutes

    Kcal: 150 kcal per serving | Servings: 4 servings

    #eggplantsoup #tomatosoup #vegetablesoup #comfortfood #healthyrecipes #veganrecipes #glutenfree #plantbased #souprecipes #homemadesoup #fallrecipes #lightmeals #easyrecipes #cleanrecipes #roastedvegetables #herbflavors #healthyeating #seasonalrecipes #soulfood #dinnerideas

    Warm up with this creamy and flavorful Eggplant and Tomato Soup — roasted to perfection and packed with herbs!
    Eggplant and Tomato Soup Creamy Roasted Eggplant and Tomato Soup with Herbs Ingredients: 2 medium eggplants, peeled and diced 4 large ripe tomatoes, chopped 1 onion, chopped 3 cloves garlic, minced 2 tablespoons olive oil 4 cups vegetable broth 1 teaspoon smoked paprika 1 teaspoon dried oregano Salt and freshly ground black pepper, to taste Fresh basil or parsley for garnish Directions: Preheat oven to 400°F (200°C). Toss diced eggplant with 1 tablespoon olive oil, salt, and pepper. Spread on a baking sheet and roast for 25-30 minutes, until tender and slightly caramelized. In a large pot, heat remaining olive oil over medium heat. Add onion and garlic, sauté until soft and fragrant, about 5 minutes. Add chopped tomatoes, roasted eggplant, smoked paprika, and oregano to the pot. Cook for 5 minutes, stirring occasionally. Pour in vegetable broth, bring to a boil, then reduce heat and simmer for 20 minutes to let flavors meld. Use an immersion blender (or transfer to a blender) to puree the soup until smooth and creamy. Adjust seasoning with salt and pepper. Serve hot, garnished with fresh basil or parsley. Prep Time: 15 minutes | Cooking Time: 50 minutes | Total Time: 65 minutes Kcal: 150 kcal per serving | Servings: 4 servings #eggplantsoup #tomatosoup #vegetablesoup #comfortfood #healthyrecipes #veganrecipes #glutenfree #plantbased #souprecipes #homemadesoup #fallrecipes #lightmeals #easyrecipes #cleanrecipes #roastedvegetables #herbflavors #healthyeating #seasonalrecipes #soulfood #dinnerideas Warm up with this creamy and flavorful Eggplant and Tomato Soup — roasted to perfection and packed with herbs!
    0 Comentários 0 Compartilhamentos 20K Visualizações
  • Quick Pickled Jalapeño Rings

    Zesty Quick Pickled Jalapeño Slices

    Ingredients:

    10–12 fresh jalapeños, thinly sliced into rings

    1 cup white vinegar

    1 cup water

    2 tablespoons granulated sugar

    1 tablespoon kosher salt

    2 cloves garlic, smashed

    1/2 teaspoon whole black peppercorns

    1/2 teaspoon coriander seeds (optional)

    Directions:

    In a small saucepan, combine vinegar, water, sugar, salt, garlic, peppercorns, and coriander seeds.

    Bring the mixture to a boil over medium-high heat, stirring until the sugar and salt are dissolved.

    Remove from heat and let it sit for 2–3 minutes.

    Place the sliced jalapeños into a clean glass jar (16 oz works well).

    Carefully pour the hot pickling liquid over the jalapeño rings until fully submerged.

    Let the jar cool to room temperature before sealing with a lid.

    Refrigerate for at least 1 hour before serving, though the flavor improves after 24 hours.

    Keep refrigerated and use within 2–3 weeks.

    Prep Time: 10 minutes | Cooking Time: 5 minutes | Cooling Time: 30 minutes | Total Time: 45 minutes

    Kcal: 5 kcal per serving | Servings: 12 servings (1 tbsp each)

    #quickpickles #pickledjalapenos #spicytoppings #homemadecondiments #jalapenolovers #tacotoppers #easyrecipes #spicyrecipes #picklingathome #chilitoppings #preservedvegetables #zestytoppings #homemadepickles #pepperslices #flavorboost #spicyaddict #quickrecipes #fridgepickles #spiceupyourmeal #kitchenhacks

    Give your tacos, burgers, and nachos a spicy punch with these Quick Pickled Jalapeño Rings! Ready in under an hour and bursting with flavor!
    Quick Pickled Jalapeño Rings Zesty Quick Pickled Jalapeño Slices Ingredients: 10–12 fresh jalapeños, thinly sliced into rings 1 cup white vinegar 1 cup water 2 tablespoons granulated sugar 1 tablespoon kosher salt 2 cloves garlic, smashed 1/2 teaspoon whole black peppercorns 1/2 teaspoon coriander seeds (optional) Directions: In a small saucepan, combine vinegar, water, sugar, salt, garlic, peppercorns, and coriander seeds. Bring the mixture to a boil over medium-high heat, stirring until the sugar and salt are dissolved. Remove from heat and let it sit for 2–3 minutes. Place the sliced jalapeños into a clean glass jar (16 oz works well). Carefully pour the hot pickling liquid over the jalapeño rings until fully submerged. Let the jar cool to room temperature before sealing with a lid. Refrigerate for at least 1 hour before serving, though the flavor improves after 24 hours. Keep refrigerated and use within 2–3 weeks. Prep Time: 10 minutes | Cooking Time: 5 minutes | Cooling Time: 30 minutes | Total Time: 45 minutes Kcal: 5 kcal per serving | Servings: 12 servings (1 tbsp each) #quickpickles #pickledjalapenos #spicytoppings #homemadecondiments #jalapenolovers #tacotoppers #easyrecipes #spicyrecipes #picklingathome #chilitoppings #preservedvegetables #zestytoppings #homemadepickles #pepperslices #flavorboost #spicyaddict #quickrecipes #fridgepickles #spiceupyourmeal #kitchenhacks Give your tacos, burgers, and nachos a spicy punch with these Quick Pickled Jalapeño Rings! Ready in under an hour and bursting with flavor!
    0 Comentários 0 Compartilhamentos 20K Visualizações
  • Roasted Garlic and Zucchini Pasta

    Creamy Roasted Garlic and Tender Zucchini Pasta Delight

    Ingredients:

    12 oz spaghetti or your favorite pasta

    3 medium zucchinis, sliced into half-moons

    1 whole bulb of garlic

    3 tablespoons olive oil, divided

    1/2 cup grated Parmesan cheese

    1/4 cup fresh basil, chopped

    1/4 teaspoon red pepper flakes (optional)

    Salt and freshly ground black pepper, to taste

    Juice of half a lemon

    Directions:

    Preheat oven to 400°F (200°C). Slice the top off the garlic bulb, drizzle with 1 tablespoon olive oil, wrap in foil, and roast for 30-35 minutes until soft and golden.

    While garlic roasts, cook pasta according to package instructions until al dente. Reserve 1 cup pasta water before draining.

    In a large skillet, heat 2 tablespoons olive oil over medium heat. Add zucchini slices, season with salt and pepper, and sauté until tender and slightly caramelized, about 5-7 minutes.

    Once garlic is cool enough to handle, squeeze the roasted garlic cloves out of their skins into a bowl and mash into a smooth paste.

    Add the roasted garlic paste to the skillet with zucchini. Toss in cooked pasta and Parmesan cheese. Add lemon juice and red pepper flakes, if using.

    Slowly add reserved pasta water a little at a time to create a silky sauce, tossing until well combined. Adjust seasoning to taste.

    Garnish with fresh basil and extra Parmesan before serving.

    Prep Time: 10 minutes | Cooking Time: 40 minutes | Total Time: 50 minutes

    Kcal: 380 kcal per serving | Servings: 4 servings

    #roastedgarlicpasta #zucchinipasta #italianrecipes #pastarecipe #vegetarianmeal #comfortfood #easyweeknightdinner #garliclover #healthyrecipes #simplemeals #freshingredients #italiancuisine #homecooking #pastaideas #summerrecipes #freshbasil #parmesancheese #garlicflavor #veggiepasta #deliciousdinner

    Craving comfort food with a fresh twist? Try this Roasted Garlic and Zucchini Pasta—creamy, flavorful, and easy to make any night of the week!
    Roasted Garlic and Zucchini Pasta Creamy Roasted Garlic and Tender Zucchini Pasta Delight Ingredients: 12 oz spaghetti or your favorite pasta 3 medium zucchinis, sliced into half-moons 1 whole bulb of garlic 3 tablespoons olive oil, divided 1/2 cup grated Parmesan cheese 1/4 cup fresh basil, chopped 1/4 teaspoon red pepper flakes (optional) Salt and freshly ground black pepper, to taste Juice of half a lemon Directions: Preheat oven to 400°F (200°C). Slice the top off the garlic bulb, drizzle with 1 tablespoon olive oil, wrap in foil, and roast for 30-35 minutes until soft and golden. While garlic roasts, cook pasta according to package instructions until al dente. Reserve 1 cup pasta water before draining. In a large skillet, heat 2 tablespoons olive oil over medium heat. Add zucchini slices, season with salt and pepper, and sauté until tender and slightly caramelized, about 5-7 minutes. Once garlic is cool enough to handle, squeeze the roasted garlic cloves out of their skins into a bowl and mash into a smooth paste. Add the roasted garlic paste to the skillet with zucchini. Toss in cooked pasta and Parmesan cheese. Add lemon juice and red pepper flakes, if using. Slowly add reserved pasta water a little at a time to create a silky sauce, tossing until well combined. Adjust seasoning to taste. Garnish with fresh basil and extra Parmesan before serving. Prep Time: 10 minutes | Cooking Time: 40 minutes | Total Time: 50 minutes Kcal: 380 kcal per serving | Servings: 4 servings #roastedgarlicpasta #zucchinipasta #italianrecipes #pastarecipe #vegetarianmeal #comfortfood #easyweeknightdinner #garliclover #healthyrecipes #simplemeals #freshingredients #italiancuisine #homecooking #pastaideas #summerrecipes #freshbasil #parmesancheese #garlicflavor #veggiepasta #deliciousdinner Craving comfort food with a fresh twist? Try this Roasted Garlic and Zucchini Pasta—creamy, flavorful, and easy to make any night of the week!
    0 Comentários 0 Compartilhamentos 20K Visualizações
  • If you’re looking for a cozy bowl of comfort that might just sweep you off your feet, look no further than this Marry Me Chicken Soup! It’s rich, creamy, and full of flavors that will make you want to savor every spoonful.

    Ingredients:
    - 1 tablespoon olive oil
    - 1 pound boneless, skinless chicken thighs, diced
    - 1 teaspoon garlic powder
    - 1 teaspoon onion powder
    - 1 teaspoon Italian seasoning
    - Salt and pepper, to taste
    - 4 cups chicken broth (low sodium)
    - 1 cup heavy cream
    - 1 cup spinach, chopped
    - 1/2 cup sun-dried tomatoes, chopped
    - 1/2 cup grated Parmesan cheese
    - 1/4 cup fresh basil, chopped (optional for garnish)

    Directions:
    1. In a large pot, heat the olive oil over medium heat. Toss in the diced chicken thighs and generously season with garlic powder, onion powder, Italian seasoning, salt, and pepper. Let them sizzle until browned and cooked through, about 5-7 minutes.
    2. Pour in the chicken broth and bring everything to a gentle simmer. Let it bubble away for about 10 minutes, allowing those scrumptious flavors to mingle.
    3. Stir in the heavy cream, chopped spinach, and sun-dried tomatoes. Let it simmer for an additional 5 minutes, and watch as it transforms into a lovely creamy concoction.
    4. Finally, sprinkle in the grated Parmesan cheese and stir until it melts beautifully into the soup. Taste and adjust the seasoning if needed.
    5. Serve hot, garnished with fresh basil for an extra pop of flavor!

    Nutritional Values (per serving):
    - Serving Size: 1 cup
    - Calories: 400
    - Protein: 29g
    - Fat: 28g
    - Carbohydrates: 10g
    - Fiber: 2g

    Get ready to impress your loved ones with this deliciously comforting bowl of Marry Me Chicken Soup! #ComfortFood #MarryMeChickenSoup #SoupSeason #TastyRecipes #CreamyGoodness
    If you’re looking for a cozy bowl of comfort that might just sweep you off your feet, look no further than this Marry Me Chicken Soup! It’s rich, creamy, and full of flavors that will make you want to savor every spoonful. Ingredients: - 1 tablespoon olive oil - 1 pound boneless, skinless chicken thighs, diced - 1 teaspoon garlic powder - 1 teaspoon onion powder - 1 teaspoon Italian seasoning - Salt and pepper, to taste - 4 cups chicken broth (low sodium) - 1 cup heavy cream - 1 cup spinach, chopped - 1/2 cup sun-dried tomatoes, chopped - 1/2 cup grated Parmesan cheese - 1/4 cup fresh basil, chopped (optional for garnish) Directions: 1. In a large pot, heat the olive oil over medium heat. Toss in the diced chicken thighs and generously season with garlic powder, onion powder, Italian seasoning, salt, and pepper. Let them sizzle until browned and cooked through, about 5-7 minutes. 2. Pour in the chicken broth and bring everything to a gentle simmer. Let it bubble away for about 10 minutes, allowing those scrumptious flavors to mingle. 3. Stir in the heavy cream, chopped spinach, and sun-dried tomatoes. Let it simmer for an additional 5 minutes, and watch as it transforms into a lovely creamy concoction. 4. Finally, sprinkle in the grated Parmesan cheese and stir until it melts beautifully into the soup. Taste and adjust the seasoning if needed. 5. Serve hot, garnished with fresh basil for an extra pop of flavor! Nutritional Values (per serving): - Serving Size: 1 cup - Calories: 400 - Protein: 29g - Fat: 28g - Carbohydrates: 10g - Fiber: 2g Get ready to impress your loved ones with this deliciously comforting bowl of Marry Me Chicken Soup! #ComfortFood #MarryMeChickenSoup #SoupSeason #TastyRecipes #CreamyGoodness
    0 Comentários 0 Compartilhamentos 19K Visualizações
  • Chicken Satay

    Grilled Chicken Satay with Creamy Peanut Dipping Sauce

    Ingredients:

    For the Chicken Satay:

    1.5 lbs boneless, skinless chicken thighs (or breasts), cut into thin strips

    2 tablespoons soy sauce

    2 tablespoons coconut milk

    1 tablespoon brown sugar

    1 tablespoon lime juice

    2 garlic cloves, minced

    1 teaspoon ground coriander

    1 teaspoon turmeric

    1/2 teaspoon cumin

    Bamboo skewers (soaked in water for 30 minutes)

    For the Peanut Sauce:

    1/2 cup creamy peanut butter

    1/4 cup coconut milk

    2 tablespoons soy sauce

    1 tablespoon brown sugar

    1 tablespoon lime juice

    1 teaspoon chili garlic sauce (optional for heat)

    1/4 cup hot water (to thin as needed)

    Directions:

    In a medium bowl, combine all marinade ingredients and mix well.

    Add chicken strips to the marinade, toss to coat, cover, and refrigerate for at least 1 hour (or overnight for best flavor).

    Thread marinated chicken onto soaked skewers.

    Preheat grill or grill pan over medium-high heat. Lightly oil the grates or pan.

    Grill skewers for 3–4 minutes per side or until chicken is cooked through and slightly charred.

    Meanwhile, in a small bowl, whisk together all peanut sauce ingredients. Adjust water for desired consistency.

    Serve skewers hot with a side of peanut sauce and garnish with chopped cilantro or crushed peanuts if desired.

    Prep Time: 15 minutes | Marinate Time: 1 hour | Cooking Time: 10 minutes | Total Time: 1 hour 25 minutes

    Kcal: 320 kcal per serving | Servings: 4 servings

    #chickensatay #grilledchicken #peanutsauce #thaifood #southeastasianfood #chickenskewers #streetfoodstyle #easychickenrecipes #bbqchicken #summergrilling #sataysauce #spicydipping #coconutmarinade #mealprepideas #asianinspired #dinnerrecipes #partyappetizers #proteinpacked #flavorfulfood #homemadebbq

    These Chicken Satay skewers are grilled to perfection and paired with the creamiest peanut dipping sauce! Ideal for BBQs, weeknight dinners, or your next gathering
    Chicken Satay Grilled Chicken Satay with Creamy Peanut Dipping Sauce Ingredients: For the Chicken Satay: 1.5 lbs boneless, skinless chicken thighs (or breasts), cut into thin strips 2 tablespoons soy sauce 2 tablespoons coconut milk 1 tablespoon brown sugar 1 tablespoon lime juice 2 garlic cloves, minced 1 teaspoon ground coriander 1 teaspoon turmeric 1/2 teaspoon cumin Bamboo skewers (soaked in water for 30 minutes) For the Peanut Sauce: 1/2 cup creamy peanut butter 1/4 cup coconut milk 2 tablespoons soy sauce 1 tablespoon brown sugar 1 tablespoon lime juice 1 teaspoon chili garlic sauce (optional for heat) 1/4 cup hot water (to thin as needed) Directions: In a medium bowl, combine all marinade ingredients and mix well. Add chicken strips to the marinade, toss to coat, cover, and refrigerate for at least 1 hour (or overnight for best flavor). Thread marinated chicken onto soaked skewers. Preheat grill or grill pan over medium-high heat. Lightly oil the grates or pan. Grill skewers for 3–4 minutes per side or until chicken is cooked through and slightly charred. Meanwhile, in a small bowl, whisk together all peanut sauce ingredients. Adjust water for desired consistency. Serve skewers hot with a side of peanut sauce and garnish with chopped cilantro or crushed peanuts if desired. Prep Time: 15 minutes | Marinate Time: 1 hour | Cooking Time: 10 minutes | Total Time: 1 hour 25 minutes Kcal: 320 kcal per serving | Servings: 4 servings #chickensatay #grilledchicken #peanutsauce #thaifood #southeastasianfood #chickenskewers #streetfoodstyle #easychickenrecipes #bbqchicken #summergrilling #sataysauce #spicydipping #coconutmarinade #mealprepideas #asianinspired #dinnerrecipes #partyappetizers #proteinpacked #flavorfulfood #homemadebbq These Chicken Satay skewers are grilled to perfection and paired with the creamiest peanut dipping sauce! Ideal for BBQs, weeknight dinners, or your next gathering
    0 Comentários 0 Compartilhamentos 20K Visualizações
Páginas Impulsionadas