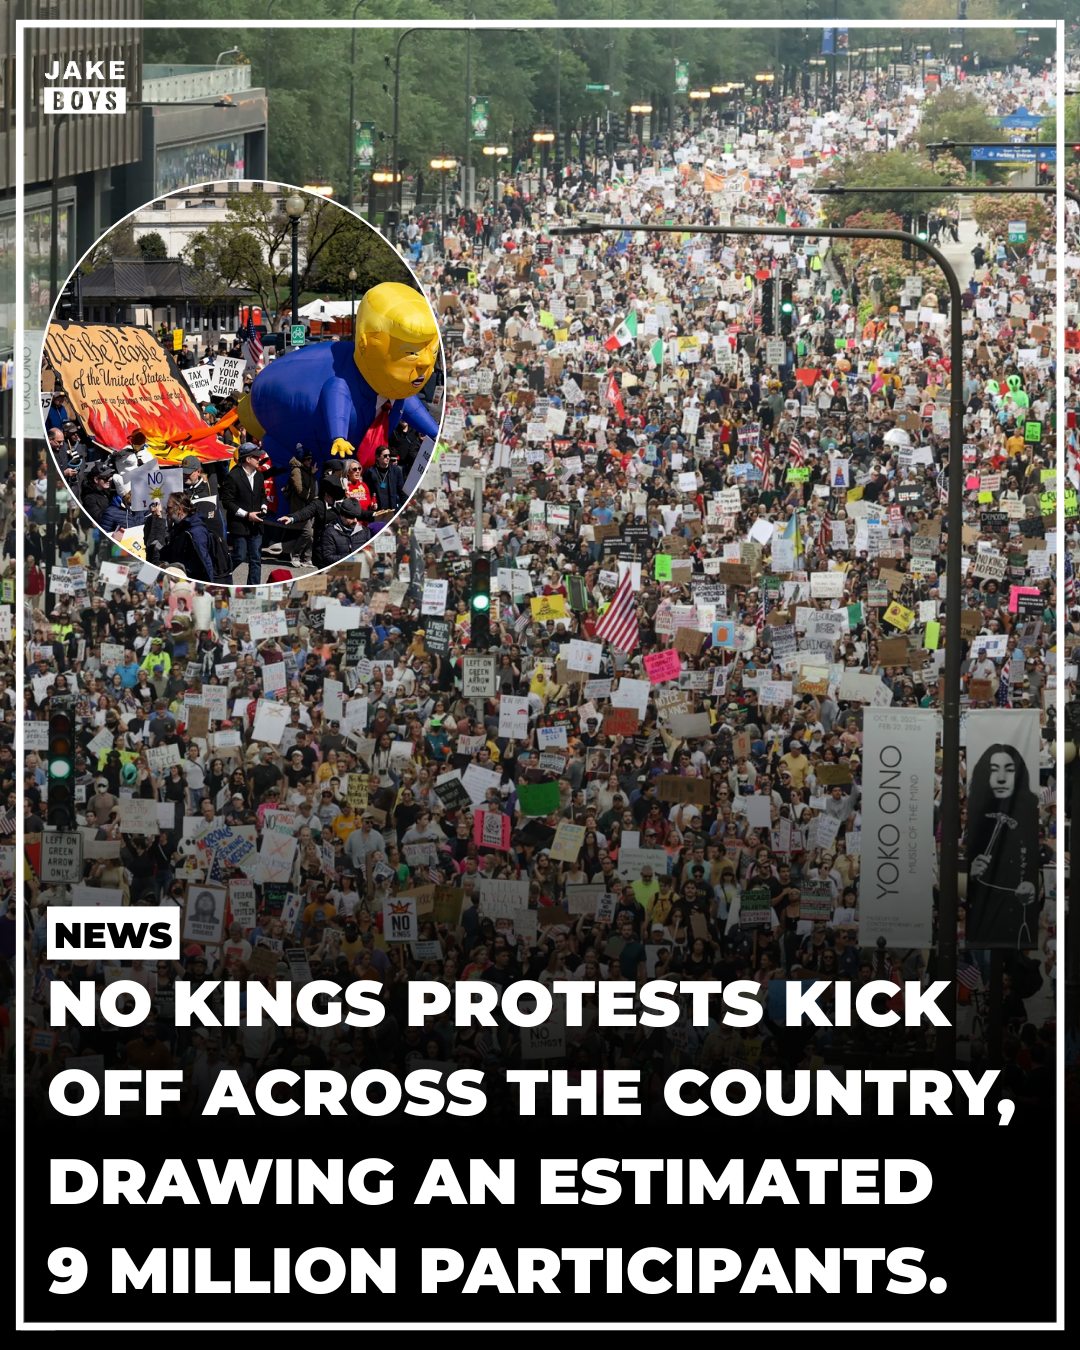
• Thai Peanut Chicken Salad

    Vibrant Thai Peanut Chicken Salad with Crisp Veggies and Creamy Dressing

    Ingredients:

    2 cups cooked chicken breast, shredded

    3 cups shredded cabbage (green or purple)

    1 cup shredded carrots

    1 red bell pepper, thinly sliced

    1/2 cup chopped fresh cilantro

    1/4 cup chopped green onions

    1/4 cup roasted peanuts, chopped

    For the Peanut Dressing:

    1/4 cup creamy peanut butter

    2 tablespoons soy sauce

    1 tablespoon lime juice

    1 tablespoon honey or maple syrup

    1 teaspoon sesame oil

    1 garlic clove, minced

    2-3 tablespoons warm water (to thin dressing as needed)

    Directions:

    In a large bowl, combine shredded chicken, cabbage, carrots, bell pepper, cilantro, and green onions.

    In a separate bowl, whisk together peanut butter, soy sauce, lime juice, honey, sesame oil, and minced garlic. Gradually add warm water to reach a smooth, pourable consistency.

    Pour the dressing over the salad and toss until everything is evenly coated.

    Sprinkle chopped roasted peanuts on top before serving.

    Serve immediately or chill for 15 minutes for flavors to meld.

    Prep Time: 15 minutes | Cooking Time: 0 minutes | Total Time: 15 minutes

    Kcal: 380 kcal per serving | Servings: 4 servings

    #thaichickensalad #peanutchickensalad #asianinspired #healthyrecipes #quickmeals #chickensalad #peanutfriends #freshsalads #lightlunch #easyrecipes #healthyeating #saladlover #glutenfree #cleaneating #lunchideas #foodie #summerrecipes #colorfulsalads #crunchy #flavorful

    Dive into this vibrant Thai Peanut Chicken Salad — creamy peanut dressing, fresh veggies, and tender chicken all in one bowl!
    Thai Peanut Chicken Salad Vibrant Thai Peanut Chicken Salad with Crisp Veggies and Creamy Dressing Ingredients: 2 cups cooked chicken breast, shredded 3 cups shredded cabbage (green or purple) 1 cup shredded carrots 1 red bell pepper, thinly sliced 1/2 cup chopped fresh cilantro 1/4 cup chopped green onions 1/4 cup roasted peanuts, chopped For the Peanut Dressing: 1/4 cup creamy peanut butter 2 tablespoons soy sauce 1 tablespoon lime juice 1 tablespoon honey or maple syrup 1 teaspoon sesame oil 1 garlic clove, minced 2-3 tablespoons warm water (to thin dressing as needed) Directions: In a large bowl, combine shredded chicken, cabbage, carrots, bell pepper, cilantro, and green onions. In a separate bowl, whisk together peanut butter, soy sauce, lime juice, honey, sesame oil, and minced garlic. Gradually add warm water to reach a smooth, pourable consistency. Pour the dressing over the salad and toss until everything is evenly coated. Sprinkle chopped roasted peanuts on top before serving. Serve immediately or chill for 15 minutes for flavors to meld. Prep Time: 15 minutes | Cooking Time: 0 minutes | Total Time: 15 minutes Kcal: 380 kcal per serving | Servings: 4 servings #thaichickensalad #peanutchickensalad #asianinspired #healthyrecipes #quickmeals #chickensalad #peanutfriends #freshsalads #lightlunch #easyrecipes #healthyeating #saladlover #glutenfree #cleaneating #lunchideas #foodie #summerrecipes #colorfulsalads #crunchy #flavorful Dive into this vibrant Thai Peanut Chicken Salad — creamy peanut dressing, fresh veggies, and tender chicken all in one bowl!
    0 Commentaires 0 Parts 20KB Vue
  • Roasted Garlic and Zucchini Pasta

    Creamy Roasted Garlic and Tender Zucchini Pasta Delight

    Ingredients:

    12 oz spaghetti or your favorite pasta

    3 medium zucchinis, sliced into half-moons

    1 whole bulb of garlic

    3 tablespoons olive oil, divided

    1/2 cup grated Parmesan cheese

    1/4 cup fresh basil, chopped

    1/4 teaspoon red pepper flakes (optional)

    Salt and freshly ground black pepper, to taste

    Juice of half a lemon

    Directions:

    Preheat oven to 400°F (200°C). Slice the top off the garlic bulb, drizzle with 1 tablespoon olive oil, wrap in foil, and roast for 30-35 minutes until soft and golden.

    While garlic roasts, cook pasta according to package instructions until al dente. Reserve 1 cup pasta water before draining.

    In a large skillet, heat 2 tablespoons olive oil over medium heat. Add zucchini slices, season with salt and pepper, and sauté until tender and slightly caramelized, about 5-7 minutes.

    Once garlic is cool enough to handle, squeeze the roasted garlic cloves out of their skins into a bowl and mash into a smooth paste.

    Add the roasted garlic paste to the skillet with zucchini. Toss in cooked pasta and Parmesan cheese. Add lemon juice and red pepper flakes, if using.

    Slowly add reserved pasta water a little at a time to create a silky sauce, tossing until well combined. Adjust seasoning to taste.

    Garnish with fresh basil and extra Parmesan before serving.

    Prep Time: 10 minutes | Cooking Time: 40 minutes | Total Time: 50 minutes

    Kcal: 380 kcal per serving | Servings: 4 servings

    #roastedgarlicpasta #zucchinipasta #italianrecipes #pastarecipe #vegetarianmeal #comfortfood #easyweeknightdinner #garliclover #healthyrecipes #simplemeals #freshingredients #italiancuisine #homecooking #pastaideas #summerrecipes #freshbasil #parmesancheese #garlicflavor #veggiepasta #deliciousdinner

    Craving comfort food with a fresh twist? Try this Roasted Garlic and Zucchini Pasta—creamy, flavorful, and easy to make any night of the week!
    Roasted Garlic and Zucchini Pasta Creamy Roasted Garlic and Tender Zucchini Pasta Delight Ingredients: 12 oz spaghetti or your favorite pasta 3 medium zucchinis, sliced into half-moons 1 whole bulb of garlic 3 tablespoons olive oil, divided 1/2 cup grated Parmesan cheese 1/4 cup fresh basil, chopped 1/4 teaspoon red pepper flakes (optional) Salt and freshly ground black pepper, to taste Juice of half a lemon Directions: Preheat oven to 400°F (200°C). Slice the top off the garlic bulb, drizzle with 1 tablespoon olive oil, wrap in foil, and roast for 30-35 minutes until soft and golden. While garlic roasts, cook pasta according to package instructions until al dente. Reserve 1 cup pasta water before draining. In a large skillet, heat 2 tablespoons olive oil over medium heat. Add zucchini slices, season with salt and pepper, and sauté until tender and slightly caramelized, about 5-7 minutes. Once garlic is cool enough to handle, squeeze the roasted garlic cloves out of their skins into a bowl and mash into a smooth paste. Add the roasted garlic paste to the skillet with zucchini. Toss in cooked pasta and Parmesan cheese. Add lemon juice and red pepper flakes, if using. Slowly add reserved pasta water a little at a time to create a silky sauce, tossing until well combined. Adjust seasoning to taste. Garnish with fresh basil and extra Parmesan before serving. Prep Time: 10 minutes | Cooking Time: 40 minutes | Total Time: 50 minutes Kcal: 380 kcal per serving | Servings: 4 servings #roastedgarlicpasta #zucchinipasta #italianrecipes #pastarecipe #vegetarianmeal #comfortfood #easyweeknightdinner #garliclover #healthyrecipes #simplemeals #freshingredients #italiancuisine #homecooking #pastaideas #summerrecipes #freshbasil #parmesancheese #garlicflavor #veggiepasta #deliciousdinner Craving comfort food with a fresh twist? Try this Roasted Garlic and Zucchini Pasta—creamy, flavorful, and easy to make any night of the week!
    0 Commentaires 0 Parts 20KB Vue
  • Chicken Satay

    Grilled Chicken Satay with Creamy Peanut Dipping Sauce

    Ingredients:

    For the Chicken Satay:

    1.5 lbs boneless, skinless chicken thighs (or breasts), cut into thin strips

    2 tablespoons soy sauce

    2 tablespoons coconut milk

    1 tablespoon brown sugar

    1 tablespoon lime juice

    2 garlic cloves, minced

    1 teaspoon ground coriander

    1 teaspoon turmeric

    1/2 teaspoon cumin

    Bamboo skewers (soaked in water for 30 minutes)

    For the Peanut Sauce:

    1/2 cup creamy peanut butter

    1/4 cup coconut milk

    2 tablespoons soy sauce

    1 tablespoon brown sugar

    1 tablespoon lime juice

    1 teaspoon chili garlic sauce (optional for heat)

    1/4 cup hot water (to thin as needed)

    Directions:

    In a medium bowl, combine all marinade ingredients and mix well.

    Add chicken strips to the marinade, toss to coat, cover, and refrigerate for at least 1 hour (or overnight for best flavor).

    Thread marinated chicken onto soaked skewers.

    Preheat grill or grill pan over medium-high heat. Lightly oil the grates or pan.

    Grill skewers for 3–4 minutes per side or until chicken is cooked through and slightly charred.

    Meanwhile, in a small bowl, whisk together all peanut sauce ingredients. Adjust water for desired consistency.

    Serve skewers hot with a side of peanut sauce and garnish with chopped cilantro or crushed peanuts if desired.

    Prep Time: 15 minutes | Marinate Time: 1 hour | Cooking Time: 10 minutes | Total Time: 1 hour 25 minutes

    Kcal: 320 kcal per serving | Servings: 4 servings

    #chickensatay #grilledchicken #peanutsauce #thaifood #southeastasianfood #chickenskewers #streetfoodstyle #easychickenrecipes #bbqchicken #summergrilling #sataysauce #spicydipping #coconutmarinade #mealprepideas #asianinspired #dinnerrecipes #partyappetizers #proteinpacked #flavorfulfood #homemadebbq

    These Chicken Satay skewers are grilled to perfection and paired with the creamiest peanut dipping sauce! Ideal for BBQs, weeknight dinners, or your next gathering
    Chicken Satay Grilled Chicken Satay with Creamy Peanut Dipping Sauce Ingredients: For the Chicken Satay: 1.5 lbs boneless, skinless chicken thighs (or breasts), cut into thin strips 2 tablespoons soy sauce 2 tablespoons coconut milk 1 tablespoon brown sugar 1 tablespoon lime juice 2 garlic cloves, minced 1 teaspoon ground coriander 1 teaspoon turmeric 1/2 teaspoon cumin Bamboo skewers (soaked in water for 30 minutes) For the Peanut Sauce: 1/2 cup creamy peanut butter 1/4 cup coconut milk 2 tablespoons soy sauce 1 tablespoon brown sugar 1 tablespoon lime juice 1 teaspoon chili garlic sauce (optional for heat) 1/4 cup hot water (to thin as needed) Directions: In a medium bowl, combine all marinade ingredients and mix well. Add chicken strips to the marinade, toss to coat, cover, and refrigerate for at least 1 hour (or overnight for best flavor). Thread marinated chicken onto soaked skewers. Preheat grill or grill pan over medium-high heat. Lightly oil the grates or pan. Grill skewers for 3–4 minutes per side or until chicken is cooked through and slightly charred. Meanwhile, in a small bowl, whisk together all peanut sauce ingredients. Adjust water for desired consistency. Serve skewers hot with a side of peanut sauce and garnish with chopped cilantro or crushed peanuts if desired. Prep Time: 15 minutes | Marinate Time: 1 hour | Cooking Time: 10 minutes | Total Time: 1 hour 25 minutes Kcal: 320 kcal per serving | Servings: 4 servings #chickensatay #grilledchicken #peanutsauce #thaifood #southeastasianfood #chickenskewers #streetfoodstyle #easychickenrecipes #bbqchicken #summergrilling #sataysauce #spicydipping #coconutmarinade #mealprepideas #asianinspired #dinnerrecipes #partyappetizers #proteinpacked #flavorfulfood #homemadebbq These Chicken Satay skewers are grilled to perfection and paired with the creamiest peanut dipping sauce! Ideal for BBQs, weeknight dinners, or your next gathering
    0 Commentaires 0 Parts 20KB Vue
  • Irish Cream Ice Cream

    Velvety Irish Cream Liqueur Ice Cream

    Ingredients:

    2 cups heavy cream

    1 cup whole milk

    3/4 cup sweetened condensed milk

    1/2 cup Irish cream liqueur (like Baileys)

    1/2 cup granulated sugar

    1 tsp vanilla extract

    Pinch of salt

    Directions:

    In a large mixing bowl, whisk together the heavy cream, whole milk, and sweetened condensed milk until fully combined.

    Add the Irish cream liqueur, granulated sugar, vanilla extract, and salt. Stir until the sugar is dissolved.

    Chill the mixture in the refrigerator for at least 2 hours or overnight for best results.

    Once chilled, pour the mixture into your ice cream maker and churn according to the manufacturer’s instructions (usually 20–25 minutes).

    Transfer the churned ice cream into an airtight container and freeze for at least 4 hours to firm up.

    Scoop and serve as-is, or top with chocolate shavings or a drizzle of Irish cream for extra indulgence.

    Prep Time: 10 minutes | Chilling Time: 2 hours | Churning Time: 25 minutes | Freezing Time: 4 hours | Total Time: 6 hours 35 minutes

    Kcal: 295 kcal | Servings: 8 servings

    #icecreamrecipe #homemadeicecream #irishcream #baileysicecream #icecreamlover #dessertideas #sweettooth #frozendessert #noeggsrecipe #dessertinspo #creamydessert #holidaytreat #alcoholicinspired #easyicecream #summercooler #vanillabean #icecreamlove #indulgentdessert #richflavor #comfortfood

    Scoop into luxury with this Velvety Irish Cream Liqueur Ice Cream! Creamy, smooth, and spiked with just enough Baileys to make every bite blissful.
    Irish Cream Ice Cream Velvety Irish Cream Liqueur Ice Cream Ingredients: 2 cups heavy cream 1 cup whole milk 3/4 cup sweetened condensed milk 1/2 cup Irish cream liqueur (like Baileys) 1/2 cup granulated sugar 1 tsp vanilla extract Pinch of salt Directions: In a large mixing bowl, whisk together the heavy cream, whole milk, and sweetened condensed milk until fully combined. Add the Irish cream liqueur, granulated sugar, vanilla extract, and salt. Stir until the sugar is dissolved. Chill the mixture in the refrigerator for at least 2 hours or overnight for best results. Once chilled, pour the mixture into your ice cream maker and churn according to the manufacturer’s instructions (usually 20–25 minutes). Transfer the churned ice cream into an airtight container and freeze for at least 4 hours to firm up. Scoop and serve as-is, or top with chocolate shavings or a drizzle of Irish cream for extra indulgence. Prep Time: 10 minutes | Chilling Time: 2 hours | Churning Time: 25 minutes | Freezing Time: 4 hours | Total Time: 6 hours 35 minutes Kcal: 295 kcal | Servings: 8 servings #icecreamrecipe #homemadeicecream #irishcream #baileysicecream #icecreamlover #dessertideas #sweettooth #frozendessert #noeggsrecipe #dessertinspo #creamydessert #holidaytreat #alcoholicinspired #easyicecream #summercooler #vanillabean #icecreamlove #indulgentdessert #richflavor #comfortfood Scoop into luxury with this Velvety Irish Cream Liqueur Ice Cream! Creamy, smooth, and spiked with just enough Baileys to make every bite blissful.
    0 Commentaires 0 Parts 19KB Vue
  • Full Strawberry Moon – June 11, 2025

    Get ready to gaze at one of the most charming lunar events of the year! On the evening of June 11, the sky will glow with the light of the Full Strawberry Moon — marking either the final full moon of spring or the first of summer, depending on the timing of the solstice.

    Why “Strawberry” Moon?
    This sweet-sounding name comes from the Algonquin tribes, who used it to signal the ripening season of wild strawberries. While the moon won’t actually turn pink, its low position during moonrise can give it a rosy or golden hue, thanks to the atmosphere.

    Best Time to Watch:
    Look to the eastern horizon just after sunset. It’ll shine bright all night, and will appear larger than usual when low in the sky — a beautiful trick of the mind known as the moon illusion.

    Fun Fact:
    In some cultures, this moon is also called the “Honey Moon,” tied to the tradition of June weddings and the idea that this is the sweetest time of year.

    Pro Tip: Head to a dark area with an open view of the horizon and bring your camera — this moonrise is one you’ll want to capture!
    Full Strawberry Moon – June 11, 2025 Get ready to gaze at one of the most charming lunar events of the year! On the evening of June 11, the sky will glow with the light of the Full Strawberry Moon — marking either the final full moon of spring or the first of summer, depending on the timing of the solstice. Why “Strawberry” Moon? This sweet-sounding name comes from the Algonquin tribes, who used it to signal the ripening season of wild strawberries. While the moon won’t actually turn pink, its low position during moonrise can give it a rosy or golden hue, thanks to the atmosphere. Best Time to Watch: Look to the eastern horizon just after sunset. It’ll shine bright all night, and will appear larger than usual when low in the sky — a beautiful trick of the mind known as the moon illusion. Fun Fact: In some cultures, this moon is also called the “Honey Moon,” tied to the tradition of June weddings and the idea that this is the sweetest time of year. Pro Tip: Head to a dark area with an open view of the horizon and bring your camera — this moonrise is one you’ll want to capture!
    0 Commentaires 0 Parts 19KB Vue
Plus de résultats